
Notifications - Corporate
Hi there! Welcome to Dex, Forte's latest and greatest payments application. With Dex, you can view, create, and manage all your transaction data—including customers, payment methods, addresses, and schedules—in one convenient place. You can also view and maintain your merchant account, keep track of your funding entries, resolve disputed transactions, and generate API credentials to connect Dex with your third-party applications.
Search for Notifications
To search for a notification, complete the following steps:
- Access the Notifications Datagrid by clicking Manage > Notifications.
- Search for the desired notification by Name or scroll through the list that displays on the Notifications Datagrid.
Column | Description |
Name | The name assigned to the notification that describes the event. |
Status | The current status of the notification. Supported options include the following: Active - A notification that Merchants and Partners can subscribe to. |
Category | The resource that makes up the trigger event. Currently, Dex supports the following resources for notifications: Transactions |
Date Created | The date when Forte created this notification. |
Type | The type of notification. Supported options include the following: Standard - Notifications created by Forte that all Merchants and Partners can subscribe to. |
Organization Type | The type of organization that can view the organization. NOTE: This column can only be viewed at the corporate level. |
View Notification Details
Notification emails enhance and automate communication between Forte and our customers by alerting our Merchants and/or Partners about the result of an action on a specified resource. All notifications—whether custom or standard—require a trigger event that initiates the email. Trigger events are comprised of three elements: a resource (e.g., IP Allow Lists or disputes), an action (e.g., dispute status changes, unauthorized access), and a result (e.g., accepted, fulfilled, expired). Currently, the following trigger event combinations are available for standard notifications:
Category | Event |
Disputes | New Disputes* Accepted |
IP Allow Lists | Unauthorized Access |
*Merchant Admins are automatically subscribed to notifications for New Disputes and the Dispute Status Changes of Won, Lost, and Documents Needed. Users with the Dispute Manager role must subscribe to the New Dispute notification. Enterprise users are automatically subscribed to the New Dispute and the Dispute Status Changes notifications. Users with the Dispute Manager role must subscribe to the New Dispute notification.
Notifications are email templates for common trigger events (e.g., New Dispute). These notifications use generic, dynamic fields in the body of the email, so that all of our Merchants and/or Partners can subscribe to the same event, but receive notification emails that contain values applicable to only that Merchant or Partner organization.
To view the details and configuration of a notification, complete the following steps:
- Access the Global Notifications Datagrid by clicking Manage > Notifications on the Dex main menu.
- Search for the desired notification by Name or find it by scrolling the Notifications Datagrid.
- Click the row on which the desired notification displays. The Notification’s Details Screen displays.
The following table describes what each data card on the Notification’s Details Screen displays:
Card/Tab | Parameter | Description |
General | Status | The status of the notification. Supported values include the following: Active |
Name | The name given for the notification template. | |
Category | The resource this notification describes. Supported values include the following: Disputes | |
Event | The action that occurs to the resource which triggers the notification. For a list of available trigger events for each resource, see the table above. | |
Organization Type | The type of organization that can view and subscribe to this notification. Supported values include the following: Merchant | |
Date Created | The date that Forte created the notification template. | |
Last Updated | The date when Forte last updated the notification template or configuration. | |
Template | The email template containing dynamic text fields. | |
Subscribers | The total number of internal and external subscribers to this email notification. NOTE: Forte Corporate users must access the merchant or partner home organizations to view the subscriber list. | |
History | For corporate users, this tab displays the history of the notification, including when it was created and updated. For merchant and partner users, this tab displays the subscription history of this notification. | |
Create Standard Notifications
NOTE: Only Forte Admins and the Product Team can create standard notifications.
All users can subscribe to standard notifications, which Forte creates and maintains at the corporate level. Once subscribed, the Merchant or Partner user receives an email at the address of his/her Dex username each time an action occurs on a specified resource. For example, if a Partner wants to know each time one of his/her merchant applications goes into Declined status, we could create a standard notification that only triggers when a merchant application is created and then declined and then advise the Partner to subscribe to this notification. Each time Forte declines a submitted application from that Partner's Organization, Dex would send an email to the Partner alerting him or her of the decline. In addition to setting the trigger for a notification, we can also customize the text of the notification email so that the recipient has an adequate level of information to act upon the notification (if necessary).
To create a standard notification, ensure that you're logged in at the corporate level (Forte Payments - 10000) and complete the following steps:
- Navigate to the Standard Notifications Datagrid (Manage > Notifications).
- Click the Create New button in the upper right-hand corner of the screen. The Create New Notification modal displays.
- Use the dropdown menu in the Category field to select a resource. Currently, Dex supports the following resources for standard notifications: Transactions, Disputes, or IP Whitelisting.Use the dropdown menu in the Event field to select the action and result combination that will trigger the notification email. The following table displays currently available events:
Category | Event |
Disputes | New Disputes* |
IP Allow Lists | Unauthorized Access |
*Merchant Admins are automatically subscribed to notifications for New Disputes and the Dispute Status Changes of Won, Lost, and Documents Needed. Users with the Dispute Manager role must subscribe to the New Dispute notification. Enterprise users are automatically subscribed to the New Dispute and the Dispute Status Changes notifications. Users with the Dispute Manager role must subscribe to the New Dispute notification.
- In the Name field, give the notification a short, but to-the-point name. A notification’s name should include a description of the trigger (i.e., the category and the event) event that initiates the notification. For example, if we’re creating a notification for successful sale transactions, we could name the standard notification “Approved Sale Transactions.” This field defaults to a generic label using the category and event selection (e.g., “Transaction Approved”).
- Select the radio button next to the organization type that should be notified about this event. Supported options include Merchant, Partner, and Enterprise organizations.
- Click the Next button. The Email Template fields display.
- Enter an email subject line in the Subject field. This field supports the dynamic Template Fields listed next to the email Body field. To add a Template Field to the subject line of the email, simply drag and drop it in the Subject field.
- Dex uses your selected Resource to auto-populate a list of dynamic Template Fields to include in the notification email. Drag and drop them into the text of the email. When Dex sends the notification, it replaces those dynamic template fields with the values pertinent to that Merchant/Partner and resource. Use the following shortcut buttons to add formatting to the email message:
Button | Description |
 | Makes the selected text bold (e.g., generic text). |
 | Italicizes the selected text (e.g., generic text). |
 | Underlines the selected text (e.g., generic text). |
 | Aligns the selected text with the left margin. |
 | Centers the selected text. |
 | Aligns the selected text with the right margin. |
 | Moves the selected text further from the margin. |
 | Hyperlinks the selected text. |
 | Enlarges selected text to create a heading or title or inserts a heading or title at a specified location in the text. |
 | Erases the formatting of selected text. |
 | Undoes the last action you did to the text of the email. |
- After creating and proofreading the text of email template, click the Next button.
- Review the settings and templates to ensure the messages are thorough and correctly formatted. To make changes click the Back button or click the navigation menu on the left to access the correct screen.
- Once you’re satisfied with the notification’s settings and email template, click the Create button. If successful, Dex displays a success message in the Create New Notification modal.
- Click Close to return to the Standard Notification Datagrid or click Create New to create another standard notification.
Edit a Standard Notification
NOTE: Only Forte Admins and the Product Team can create standard notifications.
Typos happen. Luckily, Dex gives you the ability to update standard notifications in any status—including Active, Suspended, or Deleted notifications. Remember though, any edit you make to Active notifications will affect every Merchant and Partner currently subscribed to that notification. Always proofread updates to email text.
To edit a standard notification, ensure that you're logged in at the corporate level (Forte Payments - 10000) and complete the following steps:
- Navigate to the Standard Notifications Datagrid (Manage > Notifications).
- Search for the desired notification by Name. Once you find the desired notification, click the row on which its listed. The Notification's Details Screen displays.
- To edit the name of the notification, click the Edit button (
 ) in the General settings box. An Edit Notification pop-up displays. Enter the new name for the notification in the Name field.
 - To edit the email template associated with this notification, click the Edit button () in the General settings box or the Edit button on the Template tab. The Edit Notification pop-up displays. If not already displayed, click the Email Template tab and begin editing the Subject and Body text of the email. To update the formatting of the email, use the following shortcut buttons:
 ) in the General settings box. An Edit Notification pop-up displays. Enter the new name for the notification in the Name field.
Button | Description |
| | Makes the selected text bold (e.g., generic text). |
| | Italicizes the selected text (e.g., generic text). |
| | Underlines the selected text (e.g., generic text). |
| | Aligns the selected text with the left margin. |
| | Centers the selected text. |
| | Aligns the selected text with the right margin. |
| | Moves the selected text further from the margin. |
| | Hyperlinks the selected text. |
| | Enlarges selected text to create a heading or title or inserts a heading or title at a specified location in the text. |
| | Erases the formatting of selected text. |
| | Undoes the last action you did to the text of the email. |
- After completing your updates and proofreading the text of the email, click the Save button. Dex returns you to the Notification’s Details Screen and displays a message indicating whether or not the notification was successfully updated.
Subscribe to Notifications
Dex Notifications give you the ability to keep tabs on your business by simply opening your preferred email application. Do you need to know if a transaction was declined? Need to track merchant applications that go into pending status? Want to know if and when you win or lose a dispute? By subscribing to notifications, you'll know immediately when an event occurs. This enables you to resolve issues faster and/or simply track your sales more efficiently by logging into your email account.
Dex sends notification emails to the email address you use to log into Dex (i.e., your Dex username) and only sends emails when a trigger event occurs. Trigger events are comprised of three elements: a resource (e.g., transactions, schedules, applications), an action (e.g., create, delete, sale, update), and a result (e.g., approved, success, declined). Currently, Dex supports standard notifications (i.e., available to every user of Dex) for the following commonly used resources. Each notification contains one action and one result.
Category | Event |
Disputes | New Disputes* |
IP Allow Lists | Unauthorized Access |
*Merchant Admins are automatically subscribed to notifications for New Disputes and the Dispute Status Changes of Won, Lost, and Documents Needed. Users with the Dispute Manager role must subscribe to the New Dispute notification. Enterprise users are automatically subscribed to the New Dispute and the Dispute Status Changes notifications. Users with the Dispute Manager role must subscribe to the New Dispute notification.
Subscribing to a notification is simple and can be done on any screen in Dex by completing the following steps:
- Click the Notifications icon in the upper right-hand corner of the Dex application.
- A Subscribe to Notifications Slider Modal displays on the right of your screen. Look through the notifications currently defined for your organization. NOTE: If you do not see the notification to which you’d like to subscribe, contact Forte Customer Service.
- Click the toggles (i.e., turn them green) next to each notification to which you’d like to subscribe.
- Click the Exit button to close the Subscribe to Notifications Slider Modal and return to Dex.
When a trigger event occurs, Dex emails you detailed description of the event. Notification emails do not contain sensitive data (e.g., full account numbers) and will occur immediately after the trigger event. If your email account has active junk mail filtering, you may need to add noreply@forte.net to your list of safe email addresses (if you haven’t done so already).
Suspended users will continue to receive the notifications they have subscribed to.
Deleted users will no longer receive subscribed notifications once the id is set to “Deleted”.
To unsubscribe to a notification, follow the same steps as subscribing and click on the slider (i.e., turn them gray) next to each notification to which you’d like to unsubscribe.
Creating Payment Status Notifications
Payment status notifications are emails sent to merchant users and customers for specific transaction events. You can use this feature to notify customers about payment statuses and track payment statuses.
There are three sections to the payment status notifications.
- Event and Locations
- Email Template
- Review and Launch
NOTE: You should deactivate any notifications already created in the Virtual Terminal (VT) to avoid duplicity.
To create a payment status notification:
- Navigate to the Notifications Datagrid (Manage > Notifications).
- Click the Create New button in the upper right-hand corner of the screen. The Create New Notification modal displays, defaulted to the Events and Locations section.
Events and Locations Section
-
- The name of the notification defaults to New Notification followed by the date. You can change the notification title by clicking the Edit (pencil) icon.
- Use the drop-down menu to select a Category field. The field defaults to Transactions.
- Use the drop-down menu for the Event field to select the action and result that will trigger the notification email. The available events are:
- Sale Approved
- Sale Declined
- Refund/Credit Approved
- Refund/Credit Declined
- Schedule Created
- Upcoming Schedule
NOTE: All locations under the merchant organization are automatically selected.
- After completing the Event and Locations section, click Next. The Email Template page appears.
Email Template Section
-
- Complete the following fields using manually entered email addresses or choosing from the drag-and-drop fields to the right.
- Reply To
- To
- CC
- BCC
-
- Complete the Subject field. You can change the default message by entering yours into the field.
- Complete the Message section by adding a logo to personalize the message, and customize the default message using the drag-and-drop fields or manually entering your message.
NOTE: To return to the default message, click Reset To Default or click Preview to view your message before moving to the next section.
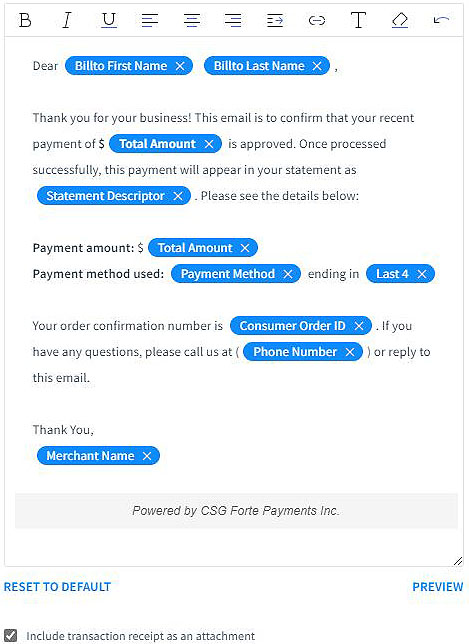
- Optional: To include a PDF receipt, click the Include transaction receipt as an attachment checkbox. These receipts are available for: Sale Approved
- Sale Approved
- Sale Declined
- Refund/Credit Approved
- Refund/Credit Declined
- When the message is complete, click Continue To Review to go to the Review and Launch page.
- Optional: To include a PDF receipt, click the Include transaction receipt as an attachment checkbox. These receipts are available for: Sale Approved
Review and Launch Section
- Check the email configuration before sending the notification.
- Use the Edit buttons to make any changes.
- Click Launch Notification.
Editing and Deleting Payment Status Notifications
After the notification is sent, you can view it in the Notifications Datagrid. You can edit or delete the notification from the datagrid. You can also delete the notification within the Edit Notification and Notification Detail views using the Action button at the top right.
To edit the notification:
- Click the ellipsis to the right of the notification you wish to edit.
- Click Edit Notification.
- Make any changes to the title or Email Template.
- Click Save Changes.
To delete the notification:
- Click the ellipsis to the right of the notification you wish to edit.
- Click Delete Notification.
- Confirm by clicking Delete.
NOTE: You cannot recover deleted notifications. Click the red X at the top right of the Delete Notification pop-up window to exit the modal without deleting.
Application Status Notifications
Application Status Notifications allow partners and/or merchants to receive email notifications on the status of an application from submission through enrollment. This feature will keep the partner and/or merchant informed about the status of the application and notify them if the event action has been selected to be received.
Note: Account Mangers will need to set up the Notifications.
Application Status Notifications are Created and Managed at the Partner org level and require CustomNotification permissions to enable the notifications.
Forte employees with one of the following roles can Create, Read, Update and Delete application status notifications at the Partner level:
-
Admin
-
Base_Cust_Relationship
-
Base_Implementation
-
Credit_Enrollment
-
Cust_Relationship_Manager
-
Credit_Enrollment_Supervisor
-
ISV_Support
-
Product_Support
Forte employees with the Base Forte role can view the application status notifications at the partner level.
Application Status Notification Process
-
Account Managers will set up the Notifications for the Partner Organzations.
-
Once the Notification has been Launched and is Active for the Partner/Portfolio(s)
-
The Application Status Notification is triggered by the Status of the Merchant Application.
-
If the Event Notification has been enabled, an email will be sent to recipients set up to receive the related Event Status Notification.
Creating Application Status Notifications
There are three sections to the application status notifications.
-
Event and Portfolios
-
Email Template
-
Review and Launch
To create the Application Status notification:
-
From the Partner Organization level, Navigate to the Notifications Datagrid (Manage > Notifications).
-
Click the Create New button in the upper right-hand corner of the screen. The Create New Notification modal displays defaulted to the Events and Portfolios section.
Events and Portfolios Section
-
The name of the notification defaults to New Notification followed by the date. You can change the notification title by clicking the Edit (pencil) icon.
-
The Category field defaults to Merchant Applications.
-
Use the drop-down menu for the Event field to select the action and result that will trigger the notification email. The available events are:
Events and Portfolios Section
-
The name of the notification defaults to New Notification followed by the date. You can change the notification title by clicking the Edit (pencil) icon.
-
The Category field defaults to Merchant Applications.
-
Use the drop-down menu for the Event field to select the action and result that will trigger the notification email. The available events are:
Notification Type | Description |
Approved | Notifies recipients when an application status has been set to approved. |
Comments | Notifies recipients when additional information is needed to consider the application for approval. |
Declined | Notifies recipients when an application status has been set to declined and includes reasons for the decline decision. |
Enrolled | Notifies recipients when and application status has been set to enrolled. This notification includes the merchant organization id, merchant location id, services enabled for the merchant and other information related to the enrollment set-up. |
PayPal Onboarding | Notifies recipients when a PayPal onboarding link has been created for the merchant. This notification includes the PayPal link for the merchant to link their Forte account with PayPal so that they can start accepting PayPal payments. |
Pending | Notifies recipients when an application status has been set to pending. |
Recalled | Notifies recipients when an application status has been set to recalled. |
Rejected | Notifies recipients when an application status has been to rejected. This notification includes the reject reasons. |
Submitted/Received | Notifies recipients when an application status is set to submitted/received |
Select the Portfolios
One or more portfolios can be selected when creating or editing a notification
Dex will display a warning sign next to any Portfolio that is already assigned to another notification with the same category/event. Users can add the portfolio and override an existing notification for that specific portfolio by clicking in the box next to the portfolio.
Note: By default, all portfolios that are not already assigned to a notification with the same event will be pre-selected when the notification is created.
After completing the Event and Locations section, click Next to go to the Email Template step.
Email Template Section
Reply To, To and Subject are required fields.
-
Complete the following fields using manually entered email addresses or choosing from the drag-and-drop fields.
-
Reply To
-
To
-
CC
-
BCC
Default drag and drop fields will be populated for these fields but can be changed accordingly.
The Reply To and To fields can be managed to include any email address.
-
-
Complete the Subject field. You can change the default message by entering yours into the field.
-
Upload your Logo. This field will not default to any logo if the user chooses not to upload a logo.
-
Email Template:
-
A default template has been provided for each Event Type. The email templates are not editable and cannot be changed.
-
Prior to launching the Notification, a Preview button can be selected to view the Category, Event, Portfolio(s) selected and the email template to be received by the email recipients.
NOTE: To return to the default message, click Reset To Default or click Preview to view your message before moving to the next section.
-
-
When the set-up is complete, click Continue To Review to go to the Review and Launch page.
Review and Launch Section
-
Check the email configuration before sending the notification.
-
Use the Edit buttons to make any changes.
-
Click Launch Notification.
When the Application Notification is launched for the selected Partner Org Portfolio(s) and a Merchant Application is received and/or changes statuses the Event Notification created
NOTE: You should deactivate any notifications already created in Webtools to avoid duplicate notifications
Searching for Notifications
To search for a notification, complete the following steps from the Partner level:
-
Access the Notifications Datagrid by clicking Manage > Notifications.
-
Search for the desired notification by Name or scroll through the list that displays on the Notifications Datagrid.
Column | Description |
Notification Name | The name assigned to the notification that describes the event. |
Status | The current status of the notification. Supported options include the following: Active - A notification that Merchants and Partners can subscribe to. |
Category | The resource that makes up the trigger event. Currently, Dex supports the following resources for custom notifications at the Partner level: Merchant Application |
Event | Indicates the event type that will trigger the event notification to be sent. |
Type | The type of notification. Supported options include the following: Standard - Notifications created by Forte that all Merchants and Partners can subscribe to. |
Last Updated | The date when Forte created or last updated this notification |
Subscribers | For standard notifications this is the number of users withing the Partner Organization that have subscribed to the event notification. |
Portfolios | Indicates the number of Portfolios enabled for the event notification. |
Editing and Deleting Payment Status Notifications
After the notification is enabled, you can view it in the Notifications Datagrid. You can edit or delete the notification from the datagrid. You can also delete the notification within the Edit Notification and Notification Detail views using the Action button at the top right.
To edit the notification:
-
Click the ellipsis to the right of the notification you wish to edit.
-
Click Edit Notification.
-
Make any changes to the title or Email Template.
-
Click Save Changes.
To delete the notification:
-
Click the ellipsis to the right of the notification you wish to edit.
-
Click Delete Notification.
-
Confirm by clicking Delete.
NOTE: You cannot recover deleted notifications. Click the red X at the top right of the Delete Notification pop-up window to exit the modal without deleting.
Resending Application Status Notifications
Resending from Application Detail
-
Access the Applications Datagrid by clicking Merchant Applications > Applications.
-
Search for the desired application or filter the Applications Datagrid display. After finding the desired application, click the row on which it's listed to access the Application's Details Screen.
-
Click the Actions drop down button
-
Select, Resend Email Notification
Resending from the Application Datagrid
-
Access the Applications Datagrid by clicking Merchant Applications > Applications.
-
Search for the desired application or filter the Applications Datagrid display. After finding the desired application, click the ellipses at the end of the row.
-
Select, Resend Email Notification
NOTE: Selecting Resend Email Notification will trigger an Application Status Notification for the current status of the Application to be resent to the specified recipient’s set-up in the notification template.