Transactions - Merchants
Hi there! Welcome to Dex, Forte's latest and greatest payments application. With Dex, you can view, create, and manage all your transaction data—including customers, payment methods, addresses, and schedules—in one convenient place. You can also view and maintain your merchant account, keep track of your funding entries, resolve disputed transactions, and generate API credentials to connect Dex with your third-party applications.
Create a Credit Card Transaction
Merchants can perform four different types of credit card transactions from the Transactions Datagrid. Additionally, merchants can choose to save the customer data from a transaction or perform a one-off transaction without saving customer data. NOTE: To create a new credit card transaction from a previously processed transaction using the same values (i.e., customer and payment method), access the original transaction and click Action > Add Transaction.
To add a new credit card transaction, complete the following steps:
- Click Transactions in the Dex Navigation menu. The Transactions Datagrid displays.
- Click the Add Transaction button in the upper right corner. The Add Transaction modal displays.
- Ensure Dex selected the correct location. If your merchant account is set up with more than one location, the Location field displays as a dropdown menu of all the merchant’s available locations.
- Click the dropdown in the Action field to select the type of transaction to perform.NOTE: Refund/Disbursement transactions require the Create Credit role. The following options are currently supported:
- Debit/Sale
- Refund/Disbursement
- Authorize
- External Authorization
- Enter the subtotal amount in the Subtotal field. This field is required.
- Calculate the tax amount and enter it into the Tax field. This field is optional.
- If you are a service-fee merchant or a merchant subscribed to the VISA Tax Program, a pre-populated Service Fee field displays beneath the Tax field. The Service Fee field only displays service fee merchants.
- As you enter values into the Subtotal, Tax, and, if applicable, Service Fee fields, Dex automatically updates the Total amount that displays in the lower-left corner of the modal.
- If you’d like to include additional order information for this transaction, fields are available in the Order Info section. Click the View all order fields to display all order information fields available for the transaction. NOTE: The configuration in the Location Transaction settings determines what fields are visible and if they are optional or required.
- If you’d like to include the Customer information, Phone and Email fields are available in the Customer Info section. NOTE: Depending on the Location Transaction Settings, these fields may or may not be required.
- If you would like to create a customer record from this transaction, click the Add new option and complete the following fields that display:
Field | Description |
First Name | The customer's first name. NOTE: A customer must have, at a minimum, values for the First Name and Last Name fields or a value for the Company Name field. |
Last Name | The customer's last name. NOTE: A customer must have, at a minimum, values for the First Name and Last Name fields or a value for the Company Name field. |
Company | The name of the customer's company. NOTE: A customer must have, at a minimum, values for the First Name and Last Name fields or a value for the Company Name field. |
Consumer ID | The merchant-defined identification number associated with the customer. |
The customer's email address. This field is optional. | |
Phone | The customer's phone number. This field is optional. |
Address Line 1 | The first line of the customer's billing address. This field is required. |
Address Line 2 | If needed, the second line of the customer's billing address. This field is optional. |
City | The city of the customer's billing address. This field is required. |
State | The state of the customer's billing address. This field is required. |
Postal | The zip or postal code of the customer's billing address. This field is required. |
Country | The country of the customer's billing address. |
- Ensure the Credit/Debit Card box is selected and then capture the credit card data by either:
- Clicking the Insert or Swipe options and then dipping or swiping the card in your eDynamo device (requires the Magtek MTSCRA service). If the dip or swipe attempt(s) fail or errors out, Dex will prompt you to manually enter the card data.
- Manually enter the card data by completing the following required fields:
Field | Description |
Card Holder Name | The first and last name of the cardholder. Both names are required. |
Card Number | The full PAN or account number listed on the card. As you type the card into the Card Number field, Dex automatically detects and displays the card type. Supported card types include the following: • Visa |
Expiration | The expiration date of the card in MM/YYYY format. This value must be a future date. |
CVV | The CVV/CVV2 number listed on the card. This field is optional. |
Postal | The zip code or postal number associated with the customer's billing address. This field is optional. |
Auth Code | The authorization code provided by the issuer for a transaction. This field only displays for External Authorization Credit Card transactions and is required. |
Procurement Card | Select this box if the credit card is a procurement card. When selected, the Account Code/PIN field displays. Enter the account code associated with the procurement card in this field. The Account Code/PIN field is required for procurement cards. |
- After completing the required fields, click the Add Transaction button. If the transaction is approved, an “Approved” message displays. From the message you can print the transaction receipt by clicking the Print Receipt button, which will display a browser Print Tab where you can configure your printer settings and print a copy of the EMV-compliant transaction receipt. NOTE: If you opt not to print the receipt at the time of submission, you can print a copy at a later time from the Transaction’s Details Screen.
Creating an eCheck Transaction
Merchants can perform six different echeck transaction from the Transactions Datagrid. Additionally, with the exception of Bank Account Owner Verification transactions, merchants can choose to save the customer data from a transaction or perform a one-off transaction without saving customer data. NOTE: To create a new echeck transaction from a previously processed transaction using the same values (i.e., customer and payment method), access the original transaction and click Action > Add Transaction.
To add a new echeck transaction, complete the following steps:
- Click Transactions in the Dex Navigation menu. The Transactions Datagrid displays.
- Click the Add Transaction button in the upper right corner. The Add Transaction modal displays.
- Ensure Dex selected the correct location. If your merchant account is set up with more than one location, the Location field displays as a dropdown menu of all the merchant’s available locations.
- Click the eCheck option at the end of the Add transaction popup. NOTE: This applies only to merchants that have both Card Services and eCheck Services enabled.
- Click the dropdown in the Transaction Action field to select the type of transaction to perform. NOTE: Refund/Disbursement transactions require the Create Credit role. The following options are currently supported:
- Debit/Sale
- Refund/Disbursement
- Authorize
- Force
- Verify
- Bank Account Owner Verification (go to step 14 for instructions on creating a Bank Account Owner Verification transaction)
- If you’d like to include an Order Number and/or Reference ID for this transaction, click the More Options dropdown. The Order Number and Reference ID fields display.
- Enter the subtotal amount in the Subtotal field. This field is required. NOTE: For Verify transactions, this field must be any value greater than $0.00.
- Calculate the tax amount and enter it into the Tax field. This field is optional.
- If you are a service-fee merchant or a merchant subscribed to the VISA Tax Program, a pre-populated Service Fee field displays beneath the Tax field. The Service Fee field only displays service fee merchants. NOTE: Dex does not charge service fees for verify-only transactions.
- As you enter values into the Subtotal, Tax, and, if applicable, Service Fee fields, Dex automatically updates the Total amount that displays in the lower-left corner of the modal.
- If you’d like to include additional order information for this transaction, fields are available in the Order Info section. Click the View all order fields to display all order information fields available for the transaction. NOTE: The configuration in the Location Transaction settings determines what fields are visible and if they are optional or required.
- If you’d like to include the Customer information, Phone and Email fields are available in the Customer Info section. NOTE: Depending on the Location Transaction Settings, these fields may or may not be required.
- If you would like to create a customer record from this transaction, click the Add new option in the Customer Info section and complete the following fields that display:
Field | Description |
First Name | The customer's first name. NOTE: A customer must have, at a minimum, values for the First Name and Last Name fields or a value for the Company Name field. |
Last Name | The customer's last name. NOTE: A customer must have, at a minimum, values for the First Name and Last Name fields or a value for the Company Name field. |
Company | The name of the customer's company. NOTE: A customer must have, at a minimum, values for the First Name and Last Name fields or a value for the Company Name field. |
The customer's email address. This field is optional. | |
Phone | The customer's phone number. This field is optional. |
Address Line 1 | The first line of the customer's billing address. This field is required. |
Address Line 2 | If needed, the second line of the customer's billing address. This field is optional. |
City | The city of the customer's billing address. This field is required. |
State | The state of the customer's billing address. This field is required. |
Postal | The zip or postal code of the customer's billing address. This field is required. |
Country | The country of the customer's billing address. |
- Complete the following required for Payment Method fields:
Field | Description |
Account Holder Name | The first and last name of the account holder. Both names are required. |
Account Type | Use the dropdown to select whether this account is a Checking or Savings account. |
Routing Number | The TRN or routing number of the bank. This value is typically the first number listed at the bottom of the check. This field is required. |
Account Number | The customer's account number. This value is typically the second number listed at the bottom of the check. The value listed in this field must match the confirmation value in the Confirm Account Number field. Both the Account Number and the Confirm Account Number fields are required. |
Entry Class Code | The entry class code for the transaction. Dex defaults this field to WEB, but you can use the dropdown to select the other available values: • ARC |
Check Number | The check number of the check. This field is optional. |
- If you would like to create a customer record from this transaction, click the Save Customer checkbox and complete the following fields that display:
Field | Description |
First Name | The customer's first name. NOTE: A customer must have, at a minimum, values for the First Name and Last Name fields or a value for the Company Name field. |
Last Name | The customer's last name. NOTE: A customer must have, at a minimum, values for the First Name and Last Name fields or a value for the Company Name field. |
Company | The name of the customer's company. NOTE: A customer must have, at a minimum, values for the First Name and Last Name fields or a value for the Company Name field. |
Consumer ID | The merchant-defined identification number associated with the customer. |
The customer's email address. This field is optional. | |
Phone | The customer's phone number. This field is optional. |
Address Line 1 | The first line of the customer's billing address. This field is required. |
Address Line 2 | If needed, the second line of the customer's billing address. This field is optional. |
City | The city of the customer's billing address. This field is required. |
State | The state of the customer's billing address. This field is required. |
Postal | The zip or postal code of the customer's billing address. This field is required. |
Country | The country of the customer's billing address. |
- After completing the required fields, click the Add Transaction button. If the transaction is approved, an “Approved” message displays. From the message you can copy the transaction ID to search for it in the dex transaction datagrid or print the transaction standard or detailed receipt clicking the Print Receipt button, which will display a browser Print Tab where you can configure your printer settings and print a copy of the transaction receipt. NOTE: If you opt not to print the receipt at the time of submission, you can print a copy at a later time from the Transaction’s Details Screen.
Creating a Bank Account Owner Verification Transaction
Merchants that have Bank Account Owner Verification – Authenticate enabled can create a bank account owner verification transaction. If this service is not enabled for the merchant than the action will not be visible in the drop-down list.
To add a new Bank Account Owner Verification transaction, complete the following steps:
- Click Transactions in the Dex Navigation menu. The Transactions Datagrid displays.
- Click the Add Transaction button in the upper right corner. The Add Transaction modal displays.
- Ensure Dex selected the correct location. If your merchant account is set up with more than one location, the Location field displays as a dropdown menu of all the merchant’s available locations.
- Click the eCheck option at the end of the Add transaction popup.
- Click the dropdown in the Transaction Action field and select Bank Account Owner Verification
- Complete the following required fields:
Field | Description |
First Name | First Name of the Bank Account Owner |
Last name | Last Name of the Bank Account Owner |
Business name | Registered Business Name of the Bank Account |
Routing and Transit Number | The TRN or routing number of the bank. This value is typically the first number listed at the bottom of the check. |
Bank Account Number | The bank account number to be verified. This value is typically the second number listed at the bottom of the check. |
Bank Account Type (optional) | Checking Account or Savings Account |
Note: First Name and Last Name or Business Name is required. First Name, Last Name and Business Name can be entered.
- After completing the required fields, click Verify Account Owner button. The verification check will return a result of Match, Conditional Match, No Match or No Into.
Search for a Transaction
The Transactions Datagrid enables merchant users with appropriate permissions to view the transactions of an Organization’s child Locations. By default, Dex displays the newest transactions by received date and time first, but you can choose to sort the results from Oldest to Newest or Newest to Oldest or can filter the displayed results by Received Date, Locations, Status, Method, Action, Amount,Order ID, Response, and/or the Last 4 digits of an account number. You can customize the number of items that display using the display dropdown in the bottom left corner.
To access the Transactions Datagrid, click Transactions in the Dex main menu. The most recent transactions display first.
To view a specific transaction without having to filter through a long list, enter one of the following values in the search bar on the Transaction Datagrid:
- Billing Company Name
- Billing First Name
- Billing Last Name
- Transaction Trace Number
- Location
- Customer ID
Dex auto-populates the list of results, which you can further refine by using the search filters described below.
The following table provides a brief description of what each column displays on the Transactions Datagrid:
Column | Description |
Received | The date and time when Forte received the transaction (e.g., March 31, 2018 04:23 PM). This timestamp data displays for the timezone of the merchant location that processed the transaction. If the location has not designated a timezone, Dex defaults to Pacific Standard Time (PST). |
Status | The status of the transaction. The following values are supported.
|
Customer | The Company Name or First and Last Name of the customer associated with this transaction. If applicable, this field also includes the merchant-specified Consumer ID. |
Order Info | If supplied, the merchant-defined Order Number and Reference ID included with the transaction. These parameters can include anything from invoice IDs, ticket numbers, or P.O. Box numbers. |
Amount/Action | Displays the transaction amount and type of transaction. Dex supports the following transaction types:
NOTE: The Auth action also displays either a D or C to indicate if the transaction was a Debit or Credit. |
Method | The payment method used plus the last four digits of the credit card or bank account number. The following values are supported:
|
Authorization Info | Displays the authorization result and the transaction source. If the transaction was approved, this column displays the Authorization Number and the Approval Code. If the transaction was declined, an "Auth Decline" message displays. If the authorization is still in progress, the column remains blank. |
Location | The name and ID of the merchant location that processed the transaction. |
If you would like to view more data related to your transactions, you can expand the Transactions Datagrid by clicking  and selecting the additional columns of data to display. The following table provides a brief description of these additional data columns:
Column | Description |
Bank Account Status Verification | Displays the P-codes associated with a Validate Plus transaction. The following options display: P15 - High Risk P20 - Negative Reports P21 - No Negative Reports P23 - Invalid Account/ABA Number P40 - No Negative Info P41 - Negative Info P50 - No Info P70 - Validated P71 - Low Risk Approval P73 - Medium Risk Approval P80 - Vendor Busy P90 - Preauth Vendor Unavailable P91 - Preauth Vendor Error P92 - Preauth Server Unavailable |
Bank Account Owner Verification | Displays the P-codes associated with an Authenticate transaction. The following options display: P10 - No Match P50 - No Info P60 - Match P75 - Conditional Match P90 - Preauth Vendor Unavailable P91 - Preauth Vendor Error P93 - Error P94 - Invalid Routing Number P94 - Invalid Account Number P95 - Bad Account |
Principal | The authorized amount of a transaction, which includes taxes (if applicable) but not service fees. |
Service Fee | The service/convenience fee for the transaction. Service fees are either a percentage of the principal or a set amount. |
Filtering the Transaction Display List
Apply the following general filters to customize the displayed transaction list:
Filter | Description |
Received | The Received Date of the transaction. Use the date picker in both the Start Date and End Date fields to customize the date range of your listed transactions or manually enter the desired dates in MM/DD/YYYY format in the provided data fields. If a date range is not provided, the End Date defaults to today's date and the Start Date defaults to yesterday. You can also choose one of the following pre-set dates/date ranges:
You can filter transactions by both Date and Time, and by default, all Date and Time filters operate in the PST time zone. This field saves the last date filter option so that you don't have to put the same option in every time you search for transactions. Note: This date filter allows only last two years of transactions to be filtered on grid.A message is displayed if the date range is entered outside this two-year limit. |
Location | Wording for Merchant Guide: Search the name or ID of the merchant location that processed the transaction.
|
Amount | The amount of the transaction. Enter only the number(s) and/or decimal point. Do not enter currency symbols. The maximum allowable amount is $100,000. |
Status | The status of the transaction. The following values are supported: In Progress
Successful
Unsuccessful
No Info |
Last 4 | The last four digits of the credit card or echeck account number. |
Account Number | The full credit card PAN or bank account number associated with the payment method. |
Order ID | The unique, merchant-defined identification number associated with this transaction. The following option is provided: Exact Match: Select this checkbox option to only filter out the display results to match and fetch the exact Order ID data. |
Method | The payment method used for the transaction. The following values are supported:
|
If you would like to refine the results of a transaction list further, you can use more specific filter parameters located under the More Filters dropdown field. The following filters are available.
Filter | Desciption |
Authorization Number | The numeric authorization number generated for the transaction (e.g., 244234). |
Action | The type of transaction. The following values are supported:
|
Order ID | The unique, merchant-defined identification number associated with this transaction. |
Source | The terminal hardware, software, or integration method used to connect to Forte. Enter a source in the free-text search field and click Update. Supported search values include the following:
|
Response | The transaction response. Users can filter transactions results by the following supported response values:
|
Bank Account Status Verification | Displays the P-codes associated with a Validate Plus transaction. The following options display:
|
Bank Account Owner Verification | Displays the P-codes associated with an Authenticate transaction. The following options display:
|
Wallets | The wallet type used for the transaction. Users can filter transactions by the following wallet types:
|
Dex has a 2048 character limit for filters applied. If the filters applied to the data grid exceed the 2048 character limit, dex will display a warning message to inform the user to reduce the number of filters and try the search again.
Viewing Transaction Details
The Transaction's Detail Screen enables merchant users with appropriate permissions to view the details of a particular transaction. A Transaction's Detail Screen displays Payment Information, Authorization and Settlement Data, the Receiver's Effective Date, Dispute Status, Transaction History, and a detailed Receipt from the transaction.
To view the details of a transaction, complete the following steps:
- Access the Transactions Datagrid by clicking Transactions on the Dex main menu.
- Search for the desired transaction by First Name, Last Name, Company Name, Transaction ID, or Location ID, or use the applicable filters to narrow down the displayed search results.
- After locating the desired transaction, click the row on which it is listed. That Transaction's Details Screen displays.
NOTE: Transactions with a status of Voided, Declined, Authorized, Rejected, Review, or Unfundedwill not display settlement information for both credit card and ACH transactions.
For more details on what the Transaction's Detail Screen displays, select whether it's a Credit Card or eCheck transaction.
Credit Card Transactions
The following table displays Payment, Receiver, Dispute, Authorization, Settlement, History, and Receipt data that could display with a credit card transactions.
ECheck Transactions
The following table displays Payment, Receiver, Authorization, Settlement, History, and Receipt data that could display with echeck or Validate/Validate+ transactions.
Card/Tab | Field | Description |
Payment Information | Status | The current status of the transaction. Supported options include the following:
|
Action | The action the transaction performs. Supported options include the following:
| |
Authorization Amount | The total authorization amount to be debited/credited plus the currency. This amount can include the Subtotal, Tax, and Service Fee amounts. | |
Customer/Company Name | The first and last name of the customer or the company name associated with the customer. | |
Wallet type | The wallet type used for this transaction. This parameter displays the logo of the following supported alternative methods of payment:
| |
Method | The card brand used for this transaction. This parameter displays the logo of the following supported card brands:
| |
Last 4 Account Number | The last four digits of the customer's credit card PAN. Note: Primary Account Number, the number that is embossed and/or encoded on a plastic card that identifies the issuer and that cardholder's account. | |
Card Holder Name | The First and Last Name or Company Name of the cardholder. | |
Card Number | The semi-redacted credit card PAN. | |
Customer ID | The merchant-defined identification number associated with the customer. | |
Expires On | The month and year when the credit card expires in mm/yyyy format. | |
Card Category | Uses the card BIN number to determine the category or amount of credit this issuer has provided for this card (e.g., Business Platinum). Note: Bank Identification Number, the issuer identification numbe of the credit card (i.e. the first six digits of the credit card's number) that uniquely identifies the institution issuing the card. See the supported values for this field: N/A AARP AIRMILES PREMIER ATM ONLY ATM ONLY - CASHLINE CARD ATM CARD BLACK BLUE BLUE AIRMILES CASH BACK CARD BLUE & REVOLVING BLUE CASH BLUE FOR BUSINESS BMI PLUS BONUS BUSINESS BUSINESS CARD BUSINESS ELITE BUSINESS PLATINUM CASH REBATE CENTURION CENTURION SERVICIO CHARGE CARD CHECK CARD CLASSIC CONSUMER CARD CONSUMER PREMIUM CARD CORP.GOLD D & RANGES CORP. GOLD S & RANGES CORP.GREEN D & RANGES CORP.GREEN S & RANGES CORP. PURCHASING CARD CORPO.CO.S & RANGES CORPORATE CORPORATE CARD CORPORATE FLEET CARD CORPORATE GOLD CORPORATE GOLD Y PLATINUM CORPORATE GREEN CORPORATE GREEN EBTA CORPORATE PURCHASE CORPORATE PURCHASING CORPORATE T CORPORATE T&E CORPORATE REVOLVING CREDIT DEBIT DELTA DIREKT DORADA ELECTRIC ORANGE ELECTRON ELECTRONIC EXECUTIVE BUSINESS GIFT GLOBAL PAYMENT GM CARD GOLD GOLD & PLATINUM GOLD BUSINESS GOLD CASH BACK CARD GOLD GRCC YBLUE GOLD/PLATINUM GOLD/PREM GOLD PREMIUM GOVERNMENT COMMERCIAL CARD GREEN GSA CARD HSA NON-SUBSTANTIATED ICARD IKEA CARD INFINITE LOWES CARD MASTERMONEY NEW WORLD OPTIMA OTHER OUROCARD PAYMENT CARD PAYPASS PAYPASS CARD PEONY PEONY MONEY LINK PEONY QUASI-CREDIT CARD PLATINUM PLUS PREMIUM PREMIUM PLUS PREMIER PREPAID PREPAID – BUSINESS PREPAID CASH PREPAID - CLASSIC PREPAID - CORPORATE T&E PREPAID - ELECTRON PREPAID - PLATINUM PREPAID - PRIVATE LABEL PREPAID TRAVEL MONEY PRIVATE PRIVATE LABEL PROPRIETARY PROPRIETARY ATM PURCHASING QUANTUM REBATE REVOLVING SALUTE SBS GOLD Y BLUE SEARS SIGNATURE SIGNATURE BUSINESS SMALL BUSINESS SMALL BUSINESS SBS GREEN SMALL CORPORATE SMALL CORPORATE CARD STANDARD STANDARD UNEMBOSSED TJ PERSONAL TRAVEL MONEY V PAY VIRGIN ATLANTIC VIRTUAL VISA CASH VISA COMMERCE WORLD WORLD CARD WORLD DEBIT EMBOSSED WORLD ELITE WORLD FOR BUSINESS | |
Issuer | The name, country, phone number, and website of the bank or issuer of the credit card. | |
Location | The name and ID of the merchant's location. | |
Customer Info(Custom Fields) | Merchant Customer Email | |
Phone Number | Merchant Customer Phone Number. | |
Receiver Effective | The date when the transaction received an authorization response. | |
Dispute Status | If applicable, the current status of any dispute the customer made against the transaction. Clicking this card takes you to the Dispute's Detail Screen. | |
Details - Authorization | Status | The status of the transaction's authorization. Supported values include the following:
|
Transaction ID | A 36-character code that uniquely identifies the transaction. | |
Authorization Number | The numeric authorization code generated for the transaction (e.g., 244234). | |
AVS Result | The result of the Address Verification Service check. The following values are supported:
| |
CVV Result | The result of the Card Verification Value check. The following values are supported:
| |
Swipe Data | A field indicating whether or not this transaction has associated magstripe data (track one or two). | |
Card Input Method | Indicates whether the cardholder data was:
NOTE: A value for this field only displays for credit card transactions. | |
Recurring Indicator | A field indicating if this transaction is part of a schedule of recurring transactions. | |
Procurement Card | A field indicating whether or not a procurement card was used for this transaction. | |
Source | The terminal hardware, software, or integration method used to connect to Forte (e.g., Direct Socket, VX520, etc). | |
IP Address | The IP Address from where the merchant/partner submitted the transaction. | |
Entered By | The name or API key of the user that created this transaction. | |
Order Info | Order ID | The unique, merchant-defined identification number associated with this transaction. |
Wallet ID | Merchant customer Wallet Id identification number associated with this transaction. | |
Data Label 1 | Merchant custom-defined fields defined in Dex. | |
Data Label 2 | Merchant custom-defined fields defined in Dex. | |
Data Label 3 | Merchant custom-defined fields defined in Dex. | |
Data Label 4 | Merchant custom-defined fields defined in Dex. | |
Data Label 5 | Merchant custom-defined fields defined in Dex. | |
Data Label 6 | Merchant custom-defined fields defined in Dex. | |
Data Label 7 | Merchant custom-defined fields defined in Dex. | |
Data Label 8 | Merchant custom-defined fields defined in Dex. | |
Data Label 9 | Merchant custom-defined fields defined in Dex. | |
Data Label 10 | Optum trace Number (OFS) | |
Order Info |
| |
Details - Settlement | Status | Indicates whether the transaction resulted in a Deposit or a Withdrawal. |
Amount | The total amount the transaction was settled for. | |
Response Code | This field displays the response and settlement codes for rejected transactions. View the supported Transaction Return Codes:
| |
History | Provides a dated and timestamped summary of all the events that have occurred with this transaction. | |
Receipt | Provides a detailed view of this transaction's receipt, including Line Items, XDATA 1-9, and other user-defined fields (e.g. Data Label 1-4 fields in Secure Web Pay). | |
Bank Account Owner Verification Transactions
The following table displays information that could display with Bank Account Owner Verification transactions.
Card/Tab | Field | Description |
Verification Information | First Name | First Name of the Bank Account Owner |
Last name | Last Name of the Bank Account Owner | |
Business name | Registered Business Name of the Bank Account Routing and Transit Number The TRN or routing number of the bank. This value is typically the first number listed at the bottom of the check. | |
Issuer | The name of the customer’s bank | |
Phone | The phone number of the customer’s bank. | |
Account Type | The type of bank account the customer is using for this transaction. Supported options include Business Checking or Business Savings. | |
Location | The name and ID of the merchant’s location. | |
Bank Account Owner Verification – Authenticate | Status | The status of the transaction’s authorization and the supported values include are as follows: Match No Match Conditional Match No Info |
Transaction ID | A 36-character code that uniquely identifies the transaction | |
Response Details | An overall result code and description of the individual components provided from the request | A05 Overall Match A05 First and Last Name Match A05 Business Match A06 Partial Match N01 No Info U80 No Match U82 Preauth Error U84 Auth Timeout U85 Auth Error |
Authorization Number | N/A | |
Source | The terminal hardware, software, or integration method used to connect to Forte (e.g., Direct Socket, VX520, etc.). | |
Entered By | The name or API key of the user that created this transaction. | |
Verify Advice | Response Type | The result of the response type check, the following results are supported: O Overall Match M First and Last Name Match B Business Name Match N No Match P Partial Match U No Info |
Verify Advice | The result of the verify advice check. The following values are supported: 300 Valid but drawn on a contributor 301 Valid participant but not a an AOA contributor/ABA masked 302 Valid participant but not an AOA data unavailable 304 No name field populated 396 AOA matching is not available because account is in one of the following categories; closed, non-DDA or no known information 900 No account owner response requested or provided 901 No account owner response requested or provided | |
Pre Auth Result & Description | The following value in these fields provide the postential result and current state of the account ownership match provided by the verifying agent are as follows: | |
POS | P60: Match | |
CON | P75: Conditional Match | |
NEG | P10: No Match | |
UNK | P50: No Info P90: Preauth Vendor Unavailable P91: Preauth Vendor Error | |
ERROR | P93: Error P94: Invalid Routing Number P95: Bad Account | |
Bank Account Owner Verification Details | The status displayed under the fields listed below will display with the transaction’s authorization. Supported values will include Match, No Match, Conditional Match and/or No Info | |
First Name & Status | First Name of the Bank Account Owner | |
Last Name & Status | Last Name of the Bank Account Owner | |
Business Name & Status | Registered Business Name of the Bank Account | |
Create a Transaction from a Previous Transaction
The Add Transaction action gives you the ability to quickly create a new transaction using the same Location, Customer, and Payment Method settings as the previously processed transaction. This action is only available for previously created Debit/Sale, Credit/Refund, Auth Only credit card transactions and Debit/Sale, Credit/Refund, Auth Only, and Force echeck transactions. NOTE: This option is not available for transactions where the payment method (i.e., credit card) has expired. To create a transaction from a previous transaction, complete the following steps:
- Search for the desired transaction by First Name, Last Name, Company Name, Trace Number, or Location ID, or use the applicable filters to narrow down the displayed search results.
- Perform the Add Transaction action using one of two methods:
- From the Transactions Datagrid, click
 > Add Transaction.
 - Access the Transaction’s Details Screen and click Actions > Add Transaction.
- From the Transactions Datagrid, click
- The Add Transaction modal displays with the Location, Customer, and Payment Method data displayed. Select the type of transaction using the dropdown menu in the Action field. Supported values include the following:
- Debit/Sale
- Refund/Disbursement
- Authorize
- Force (eCheck only)
- External Authorization (Credit Card Only)
- Verify (eCheck only)
- If you’d like to include an Order Number and/or Reference ID for this transaction, click the More Options dropdown. The Order Number and Reference ID fields display.
- Enter the subtotal amount in the Subtotal field. This field is required. NOTE: For Verify transactions, this field must be any value greater than $0.00.
- Calculate the tax amount and enter it into the Tax field. This field is optional.
- If you are a service-fee merchant or a merchant subscribed to the VISA Tax Program, a pre-populated Service Fee field displays beneath the Tax field. The Service Fee field only displays for service fee merchants. NOTE: Dex does not charge service fees for verify-only transactions.
- As you enter values into the Subtotal, Tax, and, if applicable, Service Fee fields, Dex automatically updates the Total amount that displays in the lower-left corner of the modal.
- Complete the remaining transaction fields:
- For echeck transactions, use the dropdown menu in the Entry Class Code field to select the correct SEC code. Supported values include the following:
- ARC
- CCD
- PPD
- WEB
- If desired, enter the check number in the Check Number field.
- For credit card transaction, enter the card’s verification value in the CVV field (if required) and, if desired, the customer’s billing ZIP or postal code in the Postal Code field.
- For echeck transactions, use the dropdown menu in the Entry Class Code field to select the correct SEC code. Supported values include the following:
- After completing the required fields, click the Add Transaction button. Dex displays a modal indicating the transaction’s status and, if applicable, a printable receipt. Click Done to return to the Transaction’s Details Screen.
 > Add Transaction.
Capture Transactions
Captures enable merchants to collect the funds of a previously authorized transaction. The capture amount can be equal to the authorization amount of the transaction. A capture must be performed within the authorization/pre-authorization period (i.e., when the status of the transaction is In-Progress) for credit card and echeck transactions.
To capture a transaction, complete the following steps:
- Search for the desired transaction by First Name, Last Name, Company Name, Trace Number, or Location ID or use the filters to narrow down the list of results.
- Perform the capture action using one of two methods:
- From the Transactions Summary Datagrid, click > Capture.
- Access the Transaction's Details Screen and click Actions > Capture.
- From the Transactions Summary Datagrid, click
- A Capture Transaction Message displays. Click the Capture button on the message to confirm the action. Dex returns you to the previous screen and changes the status of the transaction to In-Progress.
Card/Tab | Field | Description |
Payment Information | Status | The current status of the transaction. Supported options include the following:
|
Action | The action the transaction performs. Supported options include the following:
| |
Authorization Amount | The total authorization amount to be debited/credited plus the currency. This amount can include the Subtotal, Tax, and Service Fee amounts. | |
Customer/Company Name | The first and last name of the customer or the company name associated with the customer. | |
Wallet type | The wallet type used for this transaction. This parameter displays the logo of the following supported alternative methods of payment:
| |
Method | The card brand used for this transaction. This parameter displays the logo of the following supported card brands:
| |
Last 4 Account Number | The last four digits of the customer's credit card PAN . | |
Card Holder Name | The First and Last Name or Company Name of the cardholder. | |
Card Number | The semi-redacted credit card PAN. | |
Customer ID | The merchant-defined identification number associated with the customer. | |
Expires On | The month and year when the credit card expires in mm/yyyy format. | |
Card Category | Uses the card BIN number to determine the category or amount of credit this issuer has provided for this card (e.g., Business Platinum). Following are the supported values for this field: • N/A • AARP • AIRMILES PREMIER • ATM ONLY • ATM ONLY - CASHLINE CARD • ATM CARD • BLACK • BLUE • BLUE AIRMILES CASH BACK CARD • BLUE & REVOLVING • BLUE CASH • BLUE FOR BUSINESS • BMI PLUS • BONUS • BUSINESS • BUSINESS CARD • BUSINESS ELITE • BUSINESS PLATINUM • CASH REBATE • CENTURION • CENTURION SERVICIO • CHARGE CARD • CHECK CARD • CLASSIC • CONSUMER CARD • CONSUMER PREMIUM CARD • CORP.GOLD D & RANGES • CORP. GOLD S & RANGES • CORP.GREEN D & RANGES • CORP.GREEN S & RANGES • CORP. PURCHASING CARD • CORPO.CO.S & RANGES • CORPORATE • CORPORATE CARD • CORPORATE FLEET CARD • CORPORATE GOLD • CORPORATE GOLD Y PLATINUM • CORPORATE GREEN • CORPORATE GREEN EBTA • CORPORATE PURCHASE • CORPORATE PURCHASING • CORPORATE T • CORPORATE T&E • CORPORATE REVOLVING • CREDIT • DEBIT • DELTA • DIREKT • DORADA • ELECTRIC ORANGE • ELECTRON • ELECTRONIC • EXECUTIVE BUSINESS • GIFT • GLOBAL PAYMENT • GM CARD • GOLD • GOLD & PLATINUM • GOLD BUSINESS • GOLD CASH BACK CARD • GOLD GRCC YBLUE • GOLD/PLATINUM • GOLD/PREM • GOLD PREMIUM • GOVERNMENT • COMMERCIAL CARD • GREEN • GSA CARD • HSA NON-SUBSTANTIATED • ICARD • IKEA CARD • INFINITE • LOWES CARD • MASTERMONEY • NEW WORLD • OPTIMA • OTHER • OUROCARD • PAYMENT CARD • PAYPASS • PAYPASS CARD • PEONY • PEONY MONEY LINK • PEONY QUASI-CREDIT • CARD • PLATINUM • PLUS • PREMIUM • PREMIUM PLUS • PREMIER • PREPAID • PREPAID – BUSINESS • PREPAID CASH • PREPAID - CLASSIC • PREPAID - CORPORATE T&E • PREPAID - ELECTRON • PREPAID - PLATINUM • PREPAID - PRIVATE LABEL • PREPAID TRAVEL MONEY • PRIVATE • PRIVATE LABEL • PROPRIETARY • PROPRIETARY ATM • PURCHASING • QUANTUM • REBATE • REVOLVING • SALUTE • SBS GOLD Y BLUE • SEARS • SIGNATURE • SIGNATURE BUSINESS • SMALL BUSINESS • SMALL BUSINESS SBS GREEN • SMALL CORPORATE • SMALL CORPORATE CARD • STANDARD • STANDARD UNEMBOSSED • TJ PERSONAL • TRAVEL MONEY • V PAY • VIRGIN ATLANTIC • VIRTUAL • VISA CASH • VISA COMMERCE • WORLD • WORLD CARD • WORLD DEBIT EMBOSSED • WORLD ELITE • WORLD FOR BUSINESS | |
Issuer | The name, country, phone number, and website of the bank or issuer of the credit card. | |
Location | The name and ID of the merchant's location. | |
Customer Info(Custom Fields) | Merchant Customer Email | |
Phone Number | Merchant Customer Phone Number. | |
Receiver Effective | The date when the transaction received an authorization response. | |
Dispute Status | If applicable, the current status of any dispute the customer made against the transaction. Clicking this card takes you to the Dispute's Detail Screen. | |
Details - Authorization | Status | The status of the transaction's authorization. Supported values include the following:
|
Transaction ID | A 36-character code that uniquely identifies the transaction. | |
Authorization Number | The numeric authorization code generated for the transaction (e.g., 244234). | |
AVS Result | The result of the Address Verification Service check. The following values are supported:
| |
CVV Result | The result of the Card Verification Value check. The following values are supported:
| |
Swipe Data | A field indicating whether or not this transaction has associated magstripe data (track one or two). | |
Card Input Method | Indicates whether the cardholder data was:
NOTE: A value for this field only displays for credit card transactions. | |
Recurring Indicator | A field indicating if this transaction is part of a schedule of recurring transactions. | |
Procurement Card | A field indicating whether or not a procurement card was used for this transaction. | |
Source | The terminal hardware, software, or integration method used to connect to Forte (e.g., Direct Socket, VX520, etc). | |
IP Address | The IP Address from where the merchant/partner submitted the transaction. | |
Entered By | The name or API key of the user that created this transaction. | |
Order Info | Order ID | The unique, merchant-defined identification number associated with this transaction. |
Wallet ID | Merchant customer Wallet Id identification number associated with this transaction. | |
Data Label 1 | Merchant custom-defined fields defined in Dex. | |
Data Label 2 | Merchant custom-defined fields defined in Dex. | |
Data Label 3 | Merchant custom-defined fields defined in Dex. | |
Swipe Data | A field indicating whether or not this transaction has associated magstripe data (track one or two). | |
Data Label 4 | Merchant custom-defined fields defined in Dex. | |
Details - Settlement | Status | Indicates whether the transaction resulted in a Deposit or a Withdrawal. |
Amount | The total amount the transaction was settled for. | |
Response Code | This field displays the response and settlement codes for rejected transactions. The following Transaction Return Codes are supported:
| |
History | Provides a dated and timestamped summary of all the events that have occurred with this transaction. | |
Receipt | Provides a detailed view of this transaction's receipt, including Line Items, XDATA 1-9, and other user-defined fields (e.g. Data Label 1-4 fields in Secure Web Pay). | |
Printing a Transaction Receipt or Invoice
If you need to print a receipt or invoice for a transaction after submitting it, complete the following steps:
- Access the Transactions Datagrid by clicking Transactions on the Dex main menu.
- Search for the desired transaction by First Name, Last Name, Company Name, Trace Number, or Location ID or use the filters to narrow down the list of results.
- Click the row on which the desired transaction displays. The Transaction’s Details Screen displays.
- Click the Receipt tab.
- Click the Print Receipt dropdown button and select either Standard Receipt (available for credit and debit card transactions only) or Detailed Receipt. A browser window opens displaying the receipt or invoice.
- Configure where and how you want to print the receipt and click Print on the browser window.
You can print a detailed receipt from the Transactions Datagrid for the following:
- Debit/Sale
- Auth
- Refund/Credit
- Force/External Auth
To print a detailed receipt for one of these transactions, click the ellipsis at the right of the Transactions Datagrid and click Print Detailed Receipt.
Reverse Transactions
A Reverse takes the original charge from a billing account and retracts it (e.g., reversed sales will have a disbursement or credit performed). Reverses are performed on transactions that are too late to void because the transaction has already been sent for settlement. In Dex, merchant users with the proper permissions can only reverse transaction amounts that are less than or equal to the original transaction amount. The following table displays what types of transactions you can reverse.
Method | Action | Status |
Credit Card | Sale, Authorize, and Credit | Settled |
Echeck | Sale, Authorize, Credit, and Force | Funded |
PayPal | Sale | Successful |
To reverse a transaction, complete the following steps:
- Search for the desired transaction by First Name, Last Name, Company Name, Trace Number, or Location ID or use the filters to narrow down the list of results.
- Perform the reverse action using one of two methods:
- From the Transactions Summary Datagrid, click > Reverse.
- Access the Transaction’s Details Screen and click Actions > Reverse.
- From the Transactions Summary Datagrid, click
- A Reverse Transaction Popup Message displays.
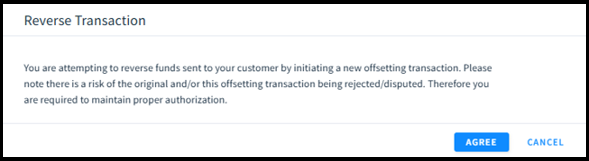
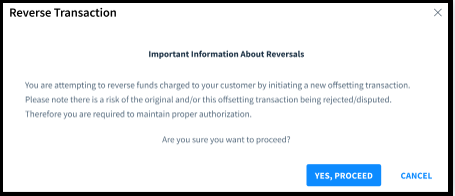
Note: When you select a transaction to reverse, Dex displays a reverse warning message based on the original transaction type.- If the original transaction is a credit, Dex displays Warning 1.

- If the original transaction is a debit, Dex displays Message 2.

- If the original transaction is a credit, Dex displays Warning 1.
- Click the Yes, Proceed button, if you agree with initiating a new reverse transaction.
- Enter the amount to reverse. The amount must:
- Be less than or equal to the original transaction amount (including tax).
- Be less than or equal to the original service fee.
- Not be a negative number.
- To reverse the service fee, select the Reverse the service fee too check box.
- Enter the amount you want to reverse. This amount must be less than or equal to the original transaction amount, for both the principal (including tax) and the service fee, and cannot be a negative number.
- Click the Reverse button on the Reverse Transaction Confirmation Message to confirm the action. Dex returns you to the previous screen and creates a new In-Progress transaction.
- The following rules determine the allowable reversal amounts based on merchant type and any prior refunds applied to the transaction:
For Non-Service Fee Customers
- No Previous Refund: Allow reversal of up to 100% of the subtotal (Principal + Tax).
- Previous Refund Exists: Allow reversal of the remaining subtotal balance (Subtotal – Prior Refund Amount).
For Service Fee Customers
- No Previous Refund: Allow subtotal reversal up to 100% of the subtotal (Principal + Tax).
- Allow service fee reversal up to 100% of the service fee.
- Previous Refund Exists: Allow subtotal reversal up to 100% of the remaining subtotal.
- Allow service fee reversal up to 100% of the remaining service fee balance.
Note: Dex does not differentiate between principal and tax during a reverse transaction, all reversal receipts will display the tax amount as $0, regardless of the original transaction.
Resubmit Transactions
A Resubmit gives merchants the ability to create a new transaction using the original parameters of a transaction. Merchants can only resubmit Debit/Sale, Credit/Refund, and Auth Only credit card transactions in the Settled status or Debit/Sale, Credit/Refund, Auth Only, and Force echeck transactions in the Funded or Rejected/Unfunded statuses. Transactions created using an alternative method of payment (Apple Pay) are not enabled to resubmit.
To resubmit a transaction, complete the following steps:
- Search for the desired transaction by First Name, Last Name, Company Name, Trace Number, or Location ID or use the filters to narrow down the list of results.
- Perform the reverse action using one of two methods:
- From the Transactions Summary Datagrid, click > Resubmit.
- Access the Transaction's Details Screen and click Actions > Resubmit.
- From the Transactions Summary Datagrid, click
- A Resubmit Confirmation Message displays. Click the Resubmit button on the Resubmit Message to confirm the action. Dex returns you to the previous screen and changes the status of the transaction to Ready.
Void Transactions
A Void is used to stop a transaction from originating (echecks) or going to settlement (credit cards) and for canceling holds on transactions that were previously authorized. You can only void a transaction once. The following table displays what types of transactions you can void.
Method | Action | Status |
Credit Card | Sale, Authorize, Credit, and Pre-Auth | Ready, Authorized, and Review |
Echeck | Sale, Authorize, Credit, and Force | Ready, Authorized, Review |
Voiding Individual Transactions
To void an individual transaction, complete the following steps:
- Search for the desired transaction by First Name, Last Name, Company Name, Trace Number, or Location ID or use the filters to narrow down the list of results.
- Perform the void action by one of two methods:
- From the Transactions Summary Datagrid, click > Void.
- Access the Transaction's Details Screen and click Actions > Void.
- From the Transactions Summary Datagrid, click
- A Void Confirmation Message displays. Click the Void button on the message to confirm the action. Dex returns you to the previous screen and changes the status of the transaction to Failed.
Voiding Transactions in Bulk
To perform a bulk void of transactions, complete the following steps:
- Access and filter the Transactions Datagrid using the Status = Ready filter field. If necessary, use the other filters to further narrow down the list of results.
- Click the checkboxes that display next to every transactions you want to void. You can also click the Select All button that displays next to the datagrid column headings. NOTE: Up to 100 transactions can be voided at a time. After clicking the eligible transactions, an activated Void button displays in the top-left corner of the datagrid.
- Click the Void button. A Void Confirmation Message displays.
- Click the Void button on the Void Confirmation Message. Dex displays a success message indicating how many of the transactions were successfully voided.
- Click the Okay button to return to the Transactions Datagrid. The newly voided transactions display as Failed.