Forte.js
Total compliance. Total control.
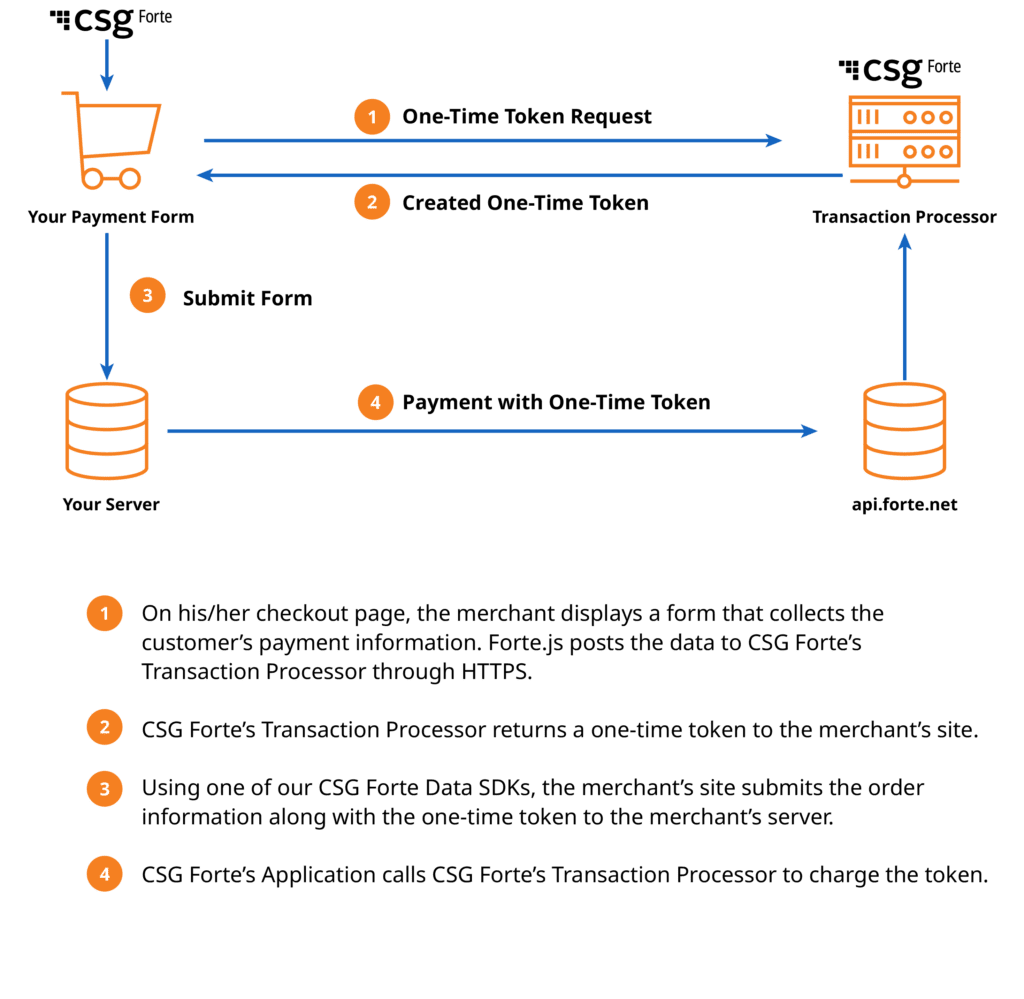
Overview
Securely capture payment information while maintaining complete control of your payment form and UX with Forte.js. Adding Forte.js to your HTTPS-hosted site reduces your PCI exposure by posting sensitive customer information directly to Forte's servers instead of your own. Forte.js also simplifies your payment processing by ensuring you don't have to worry about the complex security implications that arise when credit card or echeck data hits your server. Instead, after receiving a customer POST, Forte returns a single-use token to you, which you can use to create a transaction.
Integrating Forte.js
You can use Forte.js with your own payment form by declaring Forte attributes or by writing your own client-side script. Either integration option requires only a few lines of code.
Additionally, you can use the Forte.js one-time token with Forte's Advanced Gateway Interface (pg_onetime_token) or Forte's REST web services (e.g., one_time_token=ott_g7vnjqikszabzynu6eowbq) to create multiple transactions or permanent paymethod tokens for up to 60 minutes.
The following steps detail how to integrate Forte.js into a payment form you create.
Step 1: Generate an API Login ID
Forte.js requires a merchant-specific API Login ID to accompany the POST call to the Forte servers. You may have received this credential in your welcome notification when Forte created your merchant organization. If not, you can generate your API Login ID in Dex. You must have Merchant Admin permissions to generate your organization's API Login ID. A separate API Login ID must be created for both the Sandbox and Live environments.
Complete the following steps to generate your API Login ID:
- Log into your Dex Account.
- Search for and select the Home Organization for which you want to create the API Login ID. If your Home Organization is the same as your Logged-In Organization, skip this step.
- Click Locations on the Dex Main Menu. The Locations Datagrid displays.
- Enter Location Name or Location ID in the Search field or use the Status, States, Postal Code, or Services filters to narrow down the list of locations.
- When you find the desired merchant location, click the row on which it's listed. The Location's Detail screen displays.
- Click the Credentials tab.
- Click the Generate link under the API Login credential. A Generate API Login modal displays asking you to confirm that you want to generate the credential.
- Click the Yes, I understand and wish to generate it checkbox. This activates the Generate button.
- Click the Generate button on the Generate API Login modal. Dex returns you to the Location's Detail Screen with the newly generated credential displayed under the applicable field.
- Click the Copy link to copy the value to your computer's clipboard.
Step 2: Include Forte.js in the Payment Form
Add the following Forte.js references to the <head> tag of your payment form.
For the test environment:
<script type="text/javascript" src="https://sandbox.forte.net/api/js/v1" data-rocket-defer defer></script>
For the production environment:
<script type="text/javascript" src="https://api.forte.net/js/v1" data-rocket-defer defer></script>
Step 3: Create the Payment Form
Use one of the following two methods to create your one-time token.
Method 1: Declare Forte Attributes
The sample code below displays a simple payment form that you can use with the Forte.js script. The form declares forte-data attributes on the HTML elements according to the Forte.js API. For this option, include the API Login ID in the Submit button to automatically send the data to Forte's Transaction Processor. Note that the data input fields do not have "name" attributes. This ensures that customer data does not hit your server when the customer submits the form. Rather, the Forte.js script sends the sensitive data to the Forte Transaction Processor, which converts it into a one-time token that is returned to you.
For credit card payments, use the following form:
					Credit Card Number:<input type="text" forte-data="card_number" />
Exp month:<select forte-data="expire_month">
      <option value="1">Jan - 1</option>
      <option value="2">Feb - 2</option>
      <option value="3">Mar - 3</option>
      <option value="4">Apr - 4</option>
      <option value="5">May - 5</option>
      <option value="6">Jun - 6</option>
      <option value="7">Jul - 7</option>
      <option value="8">Aug - 8</option>
      <option value="9">Sep - 9</option>
      <option value="10">Oct - 10</option>
      <option value="11">Nov - 11</option>
      <option value="12">Dec - 12</option>
   </select>
Exp Year:<select forte-data="expire_year">
      <option value="2014">2014</option>
      <option value="2015">2015</option>
   </select>
CVV:
   <input type="text" forte-data="cvv" /><button type="submit" forte-api-login-id="API_LOGIN_ID" forte-callback-success="onTokenCreated" forte-callback-error="onTokenFailed">Submit</button>
For echeck payments, use the following form:
					Account Number:<input type="text" forte-data="account_number" />
Routing Number:<input type="text" forte-data="routing_number" />
Account Type:<input type="text" forte-data="account_type" />


<button type="submit" forte-api-login-id="API_LOGIN_ID" forte-callback-success="onTokenCreated" forte-callback-error="onTokenFailed">Submit</button>
Method 2: Use a Client-Side Script
To integrate Forte.js into a more advanced, dynamic payment form, use your own JavaScript to submit payment information. To do this, add a handler like the one displayed below to your payment form. This handler captures the submit event and sends it to the Forte Transaction Processor. This integration option provides you with more flexibility because it does not require you to add Forte.js to a defined HTML form.
Note: The sample code displayed below requires you to include your own jquery library and it must be published before testing. The code will not work if it is not published.
<script type=”text/javascript”>
$(document).ready(function () {
$(‘button[type=submit]’).on(‘click’, function () {
var data = {
api_login_id: ‘API_LOGIN_ID’,
card_number: $(‘#cc’).val(),
expire_year: $(‘#year’).val(),
expire_month: $(‘#month’).val(),
cvv: $(‘#cvv’).val(),
account_number: $(‘#dda’).val(),
routing_number: $(‘#route’).val()
account_type: $(‘#type’).val()
} forte.createToken(data)
.success(onTokenCreated)
.error(onTokenFailed);
return false;
});
});
</script>
Declare the API Login ID and the following required input fields in the data object according to the Forte.js API.
Field | Description | Type |
card_type | The customer's credit card number. | string |
expire_year | The expiration year of the customer;s credit card. [max length = 4] | string |
expire_month | The expiration month of the customer;s credit card. [max length = 2] | string |
cvv | The card verification value of the customer;s credit card. For transactions created using a one-time-token, the CVV data us sent to the authorizer. The bank decides whether to approve or decline the transaction if the CVV data is incorrect. Forte does not store the CVV value with permanent tokens or for transactions created using permanent tokens. CVV data is not sent to the bank unless the merchant provides the value in the transaction message. [max lenght = 4] | string |
account_number | The DDA account number associated with the customer's checking account. | string |
account_type | The customer;s bank account type. Supported values for this parameter are:
| string |
routing_number | The transit routing number associated with the customer;s bank. This field supports both the US and Canadian routing numbers. For more information on formatting Canadian routing numbers, see the "General" section on the FAQ page. | string |
Step 4: Capture the One-Time Token Response
After sending your payment form to the Transaction Processor, you must add a script that captures the event response to either continue the transaction process (for success events) or handle the error (for error events).
<script type=”text/javascript”>
function onTokenCreated(response) {
//do real transaction here by using the onetime_token
alert(“The onetime_token created: ” + response.onetime_token);
}
function onTokenFailed(response) {
//handle error here
alert(“Getting onetime_token failed: ” + response.response_description);
}
</script>
The Forte Transaction Processor sends the one-time token in the response object along with the following parameters:
Parameter | Description | Type |
event | Indicates whether or not Forte successfully created the one-time use token. Use one of the following values for this parameter:
| string |
request_id | The request ID number the Forte Transaction Processor generated for this transaction. | string |
card_type | Supported types include the following:
| string |
expire_year | The expiration year of the customer's credit card [max length = 4] | string |
expire_month | The expiration month of the customer's credit card [max length = 2] | string |
one_time_token | The one-time use token that Forte returns (for example: ott_ki99oclmr8c0gduavrcjww) NOTE: One-time tokens expire after 60 minutes. One-time tokens can be used multiple times for creating transactions or permanent payment tokens prior to expiration. | string |
last_4 | The last four digits of the customer's credit card number or echeck account number | string |
account_type | The customer's bank account type. Supported values for this parameter include the following:
| string |
response_code | A code that represents the transaction result. For more information on these responses, see Response Codes. | string |
response_description | A text description of the transaction result. | string |
The code sample below displays the response object of a successful event:
					{
  "event":"success",
  "request_id":"e0068a76-d41a-44af-e80a-e92d94e5d397",
  "card_type":"mast",
  "expire_year":"2015",
  "expire_month":"01",
  "one_time_token":"ott_ki99oclmr8c0gduavrcjww",
  "last_4":"4444",
  "response_code":"A01",
  "response_description":"APPROVED"
}
The following code sample displays the response object of an error event. Note that the Forte Transaction Processor only sends the response_description parameter for failure events.
					{
  "event":"failure",
  "response_description":"The card_number is invalid."
}
Understanding Errors
The following table details potential errors you could encounter when using Forte.js.
- The browser you are using is not supported. Fortejs supports the latest versions of the following browsers: Microsoft Edge, Firefox, Chrome, and Safari.
- The browser you are using is not supported. Please download the latest version of your browser to use Fortejs.
- The api_login_id is required.
- The expire_month is required.
- The account_number is required.
- The routing_number is required.
- The routing_number is invalid.
- The account_type is required.
- The account_type is invalid.
- The expire_year is required.
- The cvv is required.
- The card_number is invalid.
- The cvv is invalid.
- The expire_month and expire_year are invalid.
- Invalid authentication.