
Applications - Corporate
Hi there! Welcome to Dex, Forte's latest and greatest payments application. With Dex, you can view, create, and manage all your transaction data—including customers, payment methods, addresses, and schedules—in one convenient place. You can also view and maintain your merchant account, keep track of your funding entries, resolve disputed transactions, and generate API credentials to connect Dex with your third-party applications.
Understanding Merchant Applications
The Dex Application Portal, combined with our REST API, provides Integrated Partners and our Sales Team with a more efficient, cost-effective process for capturing and vetting merchant accounts. We've streamlined the application and onboarding process to provide a scalable solution that lowers PCI scope while supporting multi-channel payment processing. Our underwriting checks use proprietary risk models that leverage the powerful authentication technology of third-party vendors like ThreatMetrix, Lexis Nexis, and Twilio to reduce fraud and ensure a merchant's risk profile falls within our acceptable threshold ranges.
While we'll still support paper and Webtools merchant applications, the majority of our merchant applications will now come through one of the following submission channels:
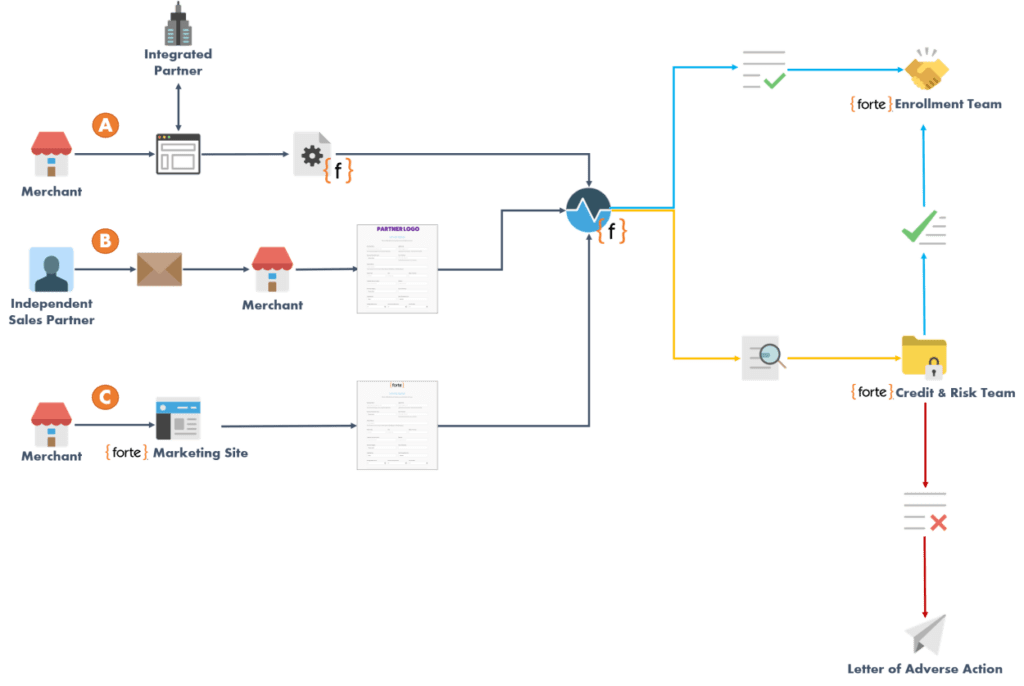
- REST API - Our integrated partners (Independent Software Vendors and/or the new PayFac-in-a-Box relationship model) create online forms that capture merchant data and connect to our platform via the objects of our REST API. Depending on their partner agreement, they may choose to perform their own underwriting or ask us to perform a certain check (e.g., Tax Identification Number (TIN) check) for a fee. These are Direct-to-Enrollment Partners whose merchant applications are automatically approved and forwarded to our Enrollment Team for onboarding.
- Dex Application Portal - The Merchant Application menu option in Dex enables corporate users and partners to view the details of a rate plan (fee schedule) and send application links directly to the merchant. Once the merchant submits the application, corporate and partner users can view the details of the application, monitor its progress (if it requires Credit and Risk review), and, if necessary, upload any required supporting documentation.
- Forte Marketing Website - Merchants who choose the Standard pricing option on Forte's Pricing page are automatically redirected to a merchant application form with the data they provide pre-populated in the corresponding fields (NOTE: Sales directly contacts Merchants who choose the Custom pricing option). This application form is the same application form that displays if a member of the Forte Sales Team emails an application invitation to the merchant directly from the Dex Application Portal. If enrolled, we typically set up these merchants under one of Forte's in-house Partner IDs (e.g.,Â
234562).
The following diagram gives a generalized overview of the application process for each of the submission channels described above:
Merchant Service Agreements (MSA)
Working with Merchant Services Agreements
The entire merchant application process starts with the Merchant Service Agreement (MSA). A MSA is a contract between the merchant or partner and Forte. It defines the terms of service set forth by Forte and defines the merchant's/partner's requirements for confidentiality, payment setup, and PCI compliance. In a nutshell, it's an all-encompassing CYA document that protects Forte from litigious merchants/partners and enables Forte to terminate merchant or partner relationships when compliance obligations are not met.
MSAs can be customized according to the Card Processor (e.g., Vantiv or Wells Fargo), the processing channel (e.g., online only, terminal, both online and terminal), and the services/combination of services the merchant is signing up for, such as ACH, Credit Card, ACH and Credit Card, Gateway only, Verify only, or all of the above. These documents are versioned and protected and cannot be created or extensively modified by anyone except Forte's Legal Counsel or Compliance Manager. Permissioned users on the Sales Team can view, print, and modify the name of active MSAs and restrict specific MSAs to specific Partner IDs (e.g., a MSA created and customized specifically for Buildium merchants).
Creating a MSA
NOTE:Â Only Forte's Legal Counsel and/or Compliance Manager can create an MSA record in Dex.
Once Forte's Legal Counsel has finalized and formatted a Merchant or Partner services agreement in Word, it can be created in Dex. Prior to creating the record in Dex, verify what the values of the Name and Version Number fields will be (the Forte Sales team will use these values to search for MSAs, so consider something simple and memorable for the Name field), and determine what underwriting checks this MSA will require. Don't worry—if you need to change these values after creating the record, you can do so while the MSA is still in Pending status.
To create a MSA, complete the following steps:
- Navigate to the Merchant Services Agreements Datagrid (Merchant Applications > Service Agreements) and click the Create New button in the upper right-hand corner.
- The Create Merchant Service Agreement Modal displays. Complete the following fields:
Field | Description |
Type | Select whether this agreement will apply to Merchants or Partners. |
Verification Checks | The underwriting verifications required for all merchant applicant using this MSA. This field is not required for Partner Agreements. Use the dropdown to select on the of the following supported options: All - Forte performs all checks (credit, phone verification, email validation, ThreatMetrix profiling, CIDV and BIDV reports, criminal reports, AOA status check, and a Tax Identification Number (TIN) check). |
Name | The name of this MSA. All corporate users with access to the Merchant Service Agreements Screens in Dex will use this field to search for an agreement. |
Version Number | The version number of this MSA. All corporate users with access to the Merchant Service Agreements Screens in Dex will use this field to search for an agreement. |
3. After defining the details, you can now copy (Ctrl + C) and paste (Ctrl + V) the text from the MSA Word document into the scrollable, free-text Agreement field. A straight copy-and-past should preserve the agreement’s formatting, including font choice, text size, and alignment. This field also includes font, formatting, and alignment menus and shortcut buttons so that you can customize the look and readability of the MSA:
Menu Option | Description |
File | If you want to delete the text that displays in the Agreement text field and start all over, select New Document. If you want a printed copy of the MSA, select the Print (Ctrl + P) option. |
Edit | This menu option contains the following available actions: Undo (Ctrl + Z) - Reverses the last action you made to the text. |
Insert | This menu option contains the following available actions: Media - Use this option to link or embed HTML5 video or audio elements to the agreement, such as YouTube marketing collateral or training videos. |
View | This menu option contains the following available actions: Show Invisible Characters - Select this option to choose whether or not to display invisible characters in the agreement, such as . |
Format | This menu option contains the following formatting actions: Bold (Ctrl + B) - Makes the selected text bold. |
Table | To add a table to the agreement, select the Table option to define the number of rows and columns to add to your table. After adding a table, the Table Properties, DeleteTable, Cell, Row, and Column options become selectable. Use these options to customize the formatting of your table, add rows and columns, and merge or split cells in your table. |
Tools | Select Source Code to view and edit the HTML used to format this agreement. |
- In addition to these menu options, the Create Merchant Service Agreement Modal also contains shortcut formatting buttons where you can quickly change the font and size of the text, add an URL or email link, change the text alignment, and/or add a numbered or bulleted lists to the agreement.
- When you complete the required fields the Create Merchant Service Agreement Modal, click the Create button. Dex returns you to the Merchant Services Agreements Datagrid with your newly created MSA record displayed in Pending status. Before this agreement can be assigned to a rate plan, it must be activated.
Finding a MSA
Corporate users with the appropriate permissions can search for MSAs by navigating to the Merchant Service Agreements Datagrid (MerchantApplication > Service Agreement) in Dex. You can search for a MSA by Name or Version Number and/or can filter the result list by Status (Active, Pending, or Archived) or Type (Merchant or Partner). Once you've found the desired MSA, click the row on which its listed to view the Merchant Services Agreement's Detail Screen.
Editing a MSA
When Forte's Legal Counsel or Compliance Manager creates a new MSA, it goes into Pending status. Pending MSAs require approval from Legal Counsel before they can be activated and assigned to a Rate Plan. While in Pending status, these MSAs can be printed, assigned to specific partners, archived, and modified NOTE: The actual verbiage of the agreement can only be modified by Legal. Once activated, only the name of an MSA can be modified.
- Navigate to the Merchant Services Agreements Datagrid (Merchant Applications > Service Agreements) and search for the specific agreement by Name or VersionNumber. Filter the results by Status (Pending) and/or MSA Type. After finding the desired MSA, click the row on which it's listed. The Merchant Services Agreement's Detail Screen displays.
- Click the Edit button in the "General Information" box. The Edit Details Modal displays.
- The following fields can be modified:
Field | Description |
Type | Supported options include Merchant and Partner. |
Verification Checks | The underwriting verifications required for all merchant applicant using this MSA. Use the dropdown to select on the of the following supported options: All - Forte performs all checks. |
Name | The name of this MSA. Once Legal activates an agreement, only this field can be modified. |
Version Number | The version number of this MSA. |
- After making your changes, click the Save button on the Edit Details Modal. Dex returns you to the Merchant Services Agreement’s Details Screen.
- To segment this MSA to a specific Partner, navigate to the Partners tab on the Merchant Services Agreement’s Details page.
- Click the Edit button next to the “Partners” header. The Add Accounts Modal displays.
- Click inside the Select an Account field and enter the name or Organization ID of the applicable Partner account. Dex will begin populating a list of search results as you type.
- Click on the Partner account you wish to add. You can only select one Partner account at a time. The Partner’s Name and ID number display in the “Accounts to be Added” section.
- To segment this MSA to more Partner accounts, repeat steps 5 and 8 until all the applicable accounts have been added. When finished, click the Save button. Dex returns you to the Merchant Services Agreement’s Details Screen with your changes displayed. NOTE: If you remove an existing Partner account from a MSA, Dex updates the rate plans associated with this agreement to the Default MSA.
Activating a Pending MSA
NOTE:Â Only Forte's Legal Counsel and/or Compliance Manager can activate a pending MSA.
Merchant Service Agreements in Pending status cannot be assigned to Rate Plans and used in merchant applications until they're activated. Because MSAs are legal agreements, they must be approved and activated by Forte's Legal Counsel. Once activated, only the name of an MSA and/or the Partner accounts assigned to that MSA can be modified; hence, a new version of a MSA requires Legal or Compliance to create a new MSA record in Dex with the new version number and to archive the MSA record with the old version number.
To activate an MSA, complete the following steps:
- Navigate to the Merchant Services Agreements Datagrid (Merchant Applications > Service Agreements) and search for the specific agreement by Name or VersionNumber. Filter the results by Status (Pending) and/or MSA Type. After finding the desired MSA, click the row on which it's listed. The Merchant Services Agreement's Detail Screen displays.
- Click Actions > Approve. The Approve Agreement Modal displays.
- Confirm the activation by click the Approve button on the Approve Agreement Modal. Dex returns you the Merchant Services Agreement's Detail Screen and displays the agreement as Active.
Adding Partners to an Active MSA
MSAs in Active status cannot be extensively modified. This reduces Forte's legal liability by protecting the versioning of these contractual agreements. However, the Forte Sales Team can assign specific Partner accounts to a MSA to use when creating that Partner's Rate Plans. To add a Partner account to a MSA, complete the following steps:
- Navigate to the Merchant Services Agreements Datagrid (Merchant Applications > Service Agreements) and search for the specific agreement by Name or Version Number. Filter the results by Status (Active) and/or MSA Type. After finding the desired MSA, click the row on which it's listed. The Merchant Services Agreement's Detail Screen displays.
- Navigate to the Partners tab.
- Click the Edit button in the "Partners" header. The Add Accounts modal displays.
- Click inside the Select an Account field and enter the name or Organization ID of the applicable Partner account. Dex will begin populating a list of search results as you type.
- Select the name of the desired Partner account. It displays in the "Accounts to be added:" section of the modal.
- Click the Save button on the Add Accounts Modal. Dex returns you to the Merchant Services Agreement's Detail Screen with the new Partner Account displayed under the Partners tab.
Making a MSA the Default
NOTE:Â Only Forte's Legal Counsel and/or Compliance Manager can default a MSA.
Most merchant applications will use the Standard or "Default" MSA. This agreement comes in two varieties that depend on the addition of the Personal Guarantor clause: Default and No PG Default. The Default MSA covers all of Forte's services and includes clauses regarding ACH/EFT processing, credit card processing, account verification/authentication, Account Updater, and the Personal Guarantor clause. The No PG Default MSA covers all of Forte's services and includes all the clauses previously listed except the Personal Guarantor clause. Only active MSA records that run all underwriting checks EXCEPT the Experian Credit Report can be defined as the NO PG Default MSA. Additionally, only MSA records that are not restricted to specific Partner accounts can be defined as the Default MSA. Dex only supports one defined Default MSA and one default No PG MSA at a time.
To define a Default MSA, complete the following steps:
- Navigate to the Merchant Services Agreements Datagrid (Merchant Applications > Service Agreements) and search for the specific agreement by Name or Version Number. Filter the results by Status (Active) and/or MSA Type. After finding the desired MSA, click the row on which it's listed. The Merchant Services Agreement's Detail Screen displays.
- Click Actions > Make Default. The Set Agreement As Default Modal displays. Alternatively, for no Personal Guarantor agreements, click Actions > Make No PG Default. The Set Agreement As No PG Default Modal displays.
- Click the Set as Default or Set as No PG Default button on the corresponding modal. Dex returns you to Merchant Services Agreement's Details Screen with the "Default MSA" or "No PG Default MSA" label displayed.
Archiving a MSA
When Forte's Legal Counsel creates a new version of a MSA or opts to no longer use a particular agreement, the old MSA record must be archived in Dex. The terms and conditions of archived MSAs still apply to all the merchants enrolled under that agreement. New versions only apply to new applicants. Once an agreement has been archived, it cannot be changed back to Active; it must be recreated. Both Pending and Active MSAs can be archived.
Before archiving a MSA, you must remove all the Partner accounts that may be assigned to it. To archive a MSA, complete the following steps:
- Navigate to the Merchant Services Agreements Datagrid (Merchant Applications > Service Agreements) and search for the specific agreement by Name or Version Number. Filter the results by Status (Active or Pending) and/or MSA Type. After finding the desired MSA, click the row on which it's listed. The Merchant Services Agreement's Details Screen displays.
- Hover over the name of the Partner account you wish to remove. A Delete button appears next to the listing.
- Click the Delete button next to each Partner account listed. The Remove Account Modal displays.
- Click the Remove button. Dex removes them from the Partners tab and returns you the Merchant Services Agreement's Details Screen.
- After removing the Partner accounts linked to this MSA, click Actions > Archive. The Archive Agreement Modal displays.
- Confirm the archive action by clicking the Archive button on the Archive Agreement Modal. Dex returns you to the Merchant Services Agreement's Details Screen with the status changed to Archived.
Rate Plans
Understanding Rate Plans
For merchant applications, Rate Plans are where the magic happens. All merchant applications begin with a Rate Plan that a Partner or Merchant agrees to for the service or combination of services Forte provides. For Partners, the pricing that makes up a rate plans can vary according to the processor, services requested (e.g., eCheck, Credit Card, and Verification vs. eCheck and Gateway) and/or Partner type (e.g., ISV Wholesale vs. ISO Retail
). Dex gives Forte's Sales Team the ability to quickly create and save a pricing matrix that can then be rendered into a Forte-hosted, online merchant application that includes a printable version of the Merchant Services Agreement (MSA) and a Pricing List. For ISO and ISV Partners using Dex, we can add the Partner's logo to these merchant applications to enhance and maintain their branding standards and/or hide our Pricing Lists so that only the Partner's pricing displays to the merchant (for Partner-billed accounts only). For ISV Partners integrated via the REST API, we can quickly create and provide them with the value(s) of theirÂ
fee_id parameter to get them up-and-running faster.
Creating Rate Plans
Partners should refer to pricing fee schedules before creating a rate plan. There are three sections to the rate plan: Portfolio and Services, Pricing, and Plan Information. These sections are followed by a Review and Activate modal.
To create a rate plan, complete the following steps:
- Navigate to the Rate Plans Datagrid (Merchant Application > Rate Plans) and click the Create New button in the upper right-hand corner of the screen. The Create Rate Plan modal displays on the Portfolio and Services section.
- The name of the rate plan displays in the upper left corner of the page. Edit the name using the pencil icon to a short, descriptive name that reflects whether the rate plan is for a specific partner or service combination.
- Complete the following fields:
Field | Description |
Partner | Select the appropriate Partner ID from the drop-down menu. This populates the Portfolio field with at list of portfolios associated with the partner organization. |
Sales Rep | Use the drop-down menu to select the appropriate sales representative for this rate plan. |
Portfolio | Select the appropriate Portfolio ID from the drop-down menu. This populates the Sales Rep field with a list of representatives associated with that account. |
Select Services | Select all services you wish to offer to your merchant:
|
Select Additional Services (Optional) | Select additional services you wish to offer to your merchant:
|
- After completing the Portfolio and Services section:
- Clicking Save and Continue will move the user to the Pricing stepper, which lists each configurable fee associated with a product or service.
- Clicking Save and Finish Later will save the configuration in a Draft mode. This allows the user to finish the rate plan configuration at a later time. Invitations can’t be sent out on draft rate plans
- Assign pricing for the selected products and services.
- If you do not want to include a printable Pricing list on the online merchant application (displays by clicking the Pricing link in the MSA and Pricing acknowledgment at the end of the application), click the Show Pricing in Merchant Application form toggle to off (i.e., gray). This option is only applicable to Partners that we bill directly and ensures the merchant applicant only sees the partner’s pricing.
- As you add products and services to a rate plan, more pricing fields are exposed. Each editable fee field is designated as either a flat amount or a percentage rate of the transaction volume. No matter what services you select, all rate plans list “Other” fees that Forte charges for every merchant account. These include the following:
- Per Bank Account Change Fee
- Merchant Location Setup Fee
- Account Re-Activation Fee
- Early Termination Fee (One Time)
- Manual Billing (Monthly)
- Gateway Monthly Fee
- Forte Non-Compliance – Monthly Fee
- All “Other” fees can be modified except the Per Bank Account Change fees.
- After completing the pricing section:
- Clicking Save and Continue will move the user to the Plan Information stepper, which lists each configurable fee associated with a product or service.
- Clicking Save and Finish Later will save the configuration in a draft mode. This allows the user to finish the rate plan configuration at a later time. Invitations can’t be sent out on draft rate plans.
- Complete the following fields:
Field | Description |
Agreement | The Agreement field automatically populates with the default agreement. You can select a custom agreement if one is available. |
Business Category | The Optional field that defines the type of business or industry of applicants. The value selected for this field determines the values that Dex populates for the Business Type drop-down field. If left blank, the applicant is required to choose a business category. |
Business Type | The Optional field defines a specific type of business and the Forte Business Classification Code of applicants. If left blank, the applicant is required to choose a business type. |
Upload Your Logo | The Optional field allows Partners to upload their own logo. The logo is visible on the application when a partner sends a link to the merchant to complete an application. |
NOTE: The Skip button at the top right allows you to move to the Review and Activate modal without selecting a Business Category and a Business Type.
- After completing the Plan Information section:
- Clicking Save and Continue will move the user to the Review and Activate stepper, for the user to review the rate plan configuration. This modal shows each selection made for the new rate plan. The Edit button at the right of each section allows you to go back to that piece section to make changes.
- Clicking Save and Finish Later will save the configuration in a draft mode. This allows the user to finish the rate plan configuration at a later time. Invitations can’t be sent out on draft rate plans.
- After confirming the pricing and products and services were correctly configured, click the Activate Rate Plan button. This action triggers a Successful Rate Plan Creation modal that confirms the rate plan has been created and allows the user to invite merchants to submit an application with the new rate plan.
- Rate Plan Creation Modal: There are several options in this modal: Invite Merchants to submit an application by entering the email addresses in the Email ID field and customize the invitation message before sending the application invitation or accept the default message and click on Send Email.
- Share the application invitation via a link by copying the link in the Share this link field.
- Click on Done to exit the modal and return to the rate plan data grid.
Searching for a Rate Plan
You can search for a Rate Plan using it’s Name or it’s assigned Fee ID, or, if you’d rather filter the list of Rate Plans displayed in the Rate Plans Datagrid, use the following filters:
Use the Sort by field to sort the list of Rate Plans by their created dates.
Filter Field | Description |
Status | The current status of the Rate Plan. Supported options include the following:
|
Services | The services defined in this Rate Plan. Supported options include the following:
|
Sales Rep | The First Name or Last Name of the sales representative associated with this Rate Plan. |
Portfolio ID | The Organization ID of the partner account (external or in-house) associated with this Rate Plan. This option can be accessed by clicking the More Filters link and selecting the applicable checkbox. |
Partner Name | The name of the partner account (external or in-house) associated with this Rate Plan. This option can be accessed by clicking the More Filters link and selecting the applicable checkbox. |
Updating a Rate Plan
With the applicable permissions, you can modify the name, services, prices, and associated MSA of any Rate Plan. To edit a Rate Plan, complete the following steps:
- Navigate to the Rate Plan Datagrid (Merchant Application > Rate Plans) and search for the desired Rate Plan by Name or Fee ID number. You can also filter the list of Rate Plans by Status, Services, Sales Rep, or Portfolio ID or Partner Name.
- After locating the desired Rate Plan record, click the row on which it’s displayed. The Rate Plan’s Details Screen displays.
- Click the Edit button in the “General Information” box. The Edit Rate Plan Modal displays the Portfolio and Services section.
- The following fields can be modified:
Field | Description |
Name | A short, descriptive name for this Rate Plan. The value of this field should reflect whether or not this Rate Plan is for a specific partner or for a specific service/combination of services. |
Services | Click the boxes corresponding to the services you want to add to or delete from this Rate Plan. eCheck:
Cards:
Verification Services:
Account Updater: requires Credit Card Acquired or Credit Card Gateway to be selected Alternative Methods of Payments: requires eCheck Acquired, Credit Card Acquired or Credit Card Gateway to be selected. PayPal Bill Payments: requires eCheck Acquired, Credit Card Acquired or Credit Card Gateway to be selected
Straight Through Processing – requires Credit Card Acquired, only available for healthcare merchants and merchant must be selected as absorbing the cost in stepper 2 when updating a rate plan. As you add or delete these services, the "Pricing" section of the modal displays the different fees required for each service. |
- After completing the updates, click the Pricing stepper (
 ) button to update the pricing
- The following fields can be modified:
Field | Description |
Name | A short, descriptive name for this Rate Plan. The value of this field should reflect whether or not this Rate Plan is for a specific partner or for a specific service/combination of services. |
Pricing | This section of the modal displays each fee associated with a service. The more services added to a Rate Plan, the more fees display. Each editable fee field is either a flat-rate amount or a percentage of the transaction amount. No matter what services you select, all Rate Plans list "Other" fees that Forte charges for every merchant account. These include the following:
|
Show pricing in Merchant Application form | This option hides the link that displays the printable Pricing modal on the online merchant application. This option is applicable to partners that we bill directly and ensures that the merchant applicant only sees the partner's pricing. |
- Click on the Plan Information stepper (
 ) button to update the Plan Information if needed. Clicking Save Changes returns you to the Rate Plan Details with your changes displayed.
- The following fields can be modified:
Field | Description |
Name | A short, descriptive name for this Rate Plan. The value of this field should reflect whether or not this Rate Plan is for a specific partner or for a specific service/combination of services. |
Agreement | Use the dropdown to select the appropriate MSA for this Rate Plan. The values in this field depend on the selected partner account. If this partner's account has not been associated to a MSA, this field will display the default agreement. |
Business Category | The type of business or industry that merchants under this rate plan are in. The value selected for this field determines the values that Dex populates for the Business Type dropdown field. |
Business Type | The specific type of business and the Forte Business Classification Code that merchants under this rate plan are in. |
Logo | Click the Delete icon to delete the existing logo. Click Browse to upload a logo |
- After completing your updates, click the Save Changes button. Dex returns you the Rate Plan’s Details Screen with your changes displayed.
Note: Clicking on the X in the upper right corner allows the user to select Save and Close or Discard the Changes. Clicking on either of these options will return the user to the Rate Plan Details.
Modifying the Branding
By default, all Rate Plan records created in Dex display the Forte logo at the top of the rendered merchant application page. However, Partner’s can choose whether or not they want to display their logo at the top of the merchant application to enhance their branding standards. They can also opt to remove all branding and just display a generic merchant application. To modify the branding associated with a Rate Plan, complete the following steps:
- Navigate to the Rate Plan Datagrid (Merchant Application > Rate Plans) and search for the desired Rate Plan by Name or Fee ID number. You can also filter the list of Rate Plans by Status, Services, Sales Rep, or Portfolio ID or Name.
- After locating the desired Rate Plan record, click the row on which it’s displayed. The Rate Plan’s Details Screen displays.
- Navigate to the Branding tab.
- If the Partner wants no branding associated with this Rate Plan, click the Enable Branding toggle to turn it off (i.e., turn it from green to gray).
- If the Partner wants to add his/her own logo, click the Edit icon in the box that’s displaying the Forte logo. The Edit Rate Plan modal opens to the Plan Information stepper.
- Click on the Delete icon to delete the existing logo.
- Click on Browse, your computer’s File Explorer Window opens. Partner logos must be a JPG, PNG, or BMP image file. This image file cannot be larger than 2mb and should be a maximum width of 250px and a maximum height of 70px.
- To ensure the logo does not display in a white box, advise the Partner to create and save it with a transparent background (not supported for JPG images) or with a background color that matches the color of the merchant application page, which is Alabaster Gray (Hex: #F9F9F9, RGB: 249, 249, 249).
- After selecting the logo file from the file explorer window, click Open.
Dex displays the Partner’s logo in the logo box in the Edit Rate Plan modal. - Click Save Changes, the user is returned to the Rate Plan Details and the “Application Logo” is visible in the logo box under the Branding tab.
- To verify that the logo displays correctly on the merchant application, click the Link to Application link in the “General Information” box of the Rate Plan’s Details Screen.
The merchant application displays in another browser window.
Sending Application Invitations
After setting up the rate plan, you can now begin sending interested merchants invitation emails that contain links to the application page. The Subject and Text of this email can be customized for merchant segments in a specific industry or for merchants seeking a specific service, such as check verification. If you’re working with Forte’s Marketing Department who’s created a HTML-coded email template with header images and embedded videos, you can copy and paste the source code to quickly and easily create a professional, branded email that sells not only our services, but Forte as a company.
You can access the Rate Plan Invite modal one of two ways:
- Access the Rate Plan Datagrid (Merchant Application > Rate Plans) and search for the desired Rate Plan by Name or Fee ID number. You can also filter the list of Rate Plans by Status, Services, Sales Rep, or Portfolio ID or Name. After locating the Rate Plan, clickÂ
> Invite in the row on which it’s displayed.
- Access the Rate Plan’s Details Screen and click Actions > Invite.
The Rate Plan Invite Modal auto-populates with predefined Subject and Text fields that you can customize using the menu and shortcut buttons that display above the Text field. - Enter the merchant applicant’s email address in the To field. If you’re sending this application to more than one merchant, separate the different email addresses with a comma. If necessary, enter one or more email addresses in the CC field.
The Subject field pre-populates with the text “Your Forte Rate Plan.” If desired, update it to your preferred text.
Note: If the application invite is for Healow LLC Partner org 430012, there will be an additional required field, APU ID. This field requires the user to enter the Healow Pay APU ID associated to the invite before the INVITE button is activated.
To customize the actual text of the email, use the following menu options:
Menu Option | Description |
File | If you want to delete the generic, default message that displays in the email text field and add your own custom message, select New Document. NOTE: This will also delete the generated link to the merchant application. Copy this link prior to selecting the New Document option. If you want a printed copy of the message, select the Print (Ctrl + P) option. |
Edit | This menu option contains the following available actions: Undo (Ctrl + Z) - Reverses the last action you made to the email text. |
Insert | This menu option contains the following available actions: Media - Use this option to link or embed HTML5 video or audio elements to your email, such as YouTube marketing collateral or training videos. |
View | This menu option contains the following available actions: Show Invisible Characters - Select this option to choose whether or not to display invisible characters in the email text, such as . |
Format | This menu option contains the following formatting actions: Bold (Ctrl + B) - Makes the selected text bold. |
Table | To add a table to you email, select the Table option to define the number of rows and columns to add to your table. After adding a table, the Table Properties, Delete Table, Cell, Row, and Column options become selectable. Use these options to customize the formatting of your table, add rows and columns, and merge or split cells in your table. |
Tools | Select Source Code to view and edit the HTML used to format this email. This option can be helpful if you prefer to simply copy and paste an already formatted email template that contains the media, images, formatting, and/or the color scheme you want to include. |
In addition to these menu options, the Rate Plan Invite Modal also contains shortcut formatting buttons where you can quickly change the font and size of the text, add an URL or email link, change the text alignment, and/or add a numbered or bulleted list. After customizing the email text to your liking, click the Invite button on the Rate Plan Invite Modal. Dex displays whether or not the email was successfully sent.
Tracking Application Submissions
A Rate Plan’s Details Screen enables you to track merchant applications as they come in and are routed through our underwriting checks. Rather than searching and filtering the Applications Datagrid, you can access a specific Rate Plan’s Detail Screen to see how many applicants we’ve enrolled, approved, recalled, declined, or placed into pending status. Additionally, you can export the list of invitations you’ve sent to a .csv file that contains the applicant’s email address, the sales rep who sent the invite, the date and status of the invitation, and the application number, status and received date. This file can then be imported into a CSM application to keep track of clients.
To view the application count of a Rate Plan, complete the following steps:
- Navigate to the Rate Plan Datagrid (Merchant Application > Rate Plans) and search for the desired Rate Plan by Name or Fee ID number. You can also filter the list of Rate Plans by Status = Active, Services, Sales Rep, or Portfolio ID or Name.
- After finding the desired Rate Plan, click the row on which it displays in the datagrid. The Rate Plan’s Details Screen displays.
- The application status counts displays in the Enrolled, Approved, Pending, Recalled, Declined boxes at the top of the screen. Clicking on each status takes you to the Merchant Application Datagrid filtered by that Status and Fee ID. From the Merchant Applications Datagrid, you can click on an application and see its Application’s Details Screen.
- If you’d like to export the applicant invite list from Dex into a .csv file, you can navigate to the Invitations tab on the Rate Plan’s Details Screen and click the Export Invite List button.
The Invitations tab displays all the invitations that have been sent to merchants under this rate plan for the last 90 days and the application’s current status. - When the list exports, you can open it in Excel to view it and then import it into a CSM application such as Sales Force.
The export file contains the Rate Plan ID, the applicant’s Email Address, the name or ID of the Sales Representative, the Invitation Date and Status, the Application ID, Status and Received Date, the CC Email Address and Custom Field 1.
Â
Note: The Custom Field 1 column will be included in the download when the users home account is set to Healowpay LLC partner org id 430012.
Suspending a Rate Plan
Rate plans that contain promotional pricing or that cater to specific subscription billing profiles can be suspended and reactivated as necessary. Once you suspend a Rate Plan, you cannot use it to send application invitations to merchants.
To suspend a rate plan, complete the following steps:
- Access the Rate Plan Datagrid (Merchant Application > Rate Plans) and search for the desired Rate Plan by Name or Fee ID number. You can also filter the list of Rate Plans by Status = Active, Services, Sales Rep, or Porfolio ID or Name.
- Access the Suspend Rate Plan Modal using one of two methods:
- From the Rate Plans Datagrid, clickÂ
> Suspend in the row on which it’s displayed.
- Access the Rate Plan’s Details Screen and click Actions > Suspend.
- From the Rate Plans Datagrid, clickÂ
- Confirm the suspension by clicking the Suspend button on the Suspend Rate Plan Modal. Dex returns you to the previous screen with the selected Rate Plan record displayed in Suspended status.
Activating a Rate Plan
You can edit the details, associated agreement, and pricing of Rate Plans in Suspended status. You just can’t send invitation emails to merchant applicants until the reactivating the Rate Plan.
To reactivate a Rate Plan, complete the following steps:
- Navigate to the Rate Plan Datagrid (Merchant Application > Rate Plans) and search for the desired Rate Plan by Name or Fee ID number. You can also filter the list of Rate Plans by Status = Suspended, Services, Sales Rep, or Portfolio ID or Name.
- Access the Activate Rate Plan Modal using one of two methods:
- From the Rate Plans Datagrid, clickÂ
> Activate in the row on which it’s displayed.
- Access the Rate Plans Details Screen and click Actions > Activate.
- From the Rate Plans Datagrid, clickÂ
- Confirm the activation by clicking the Activate button on the Activate Rate Plan Modal. Dex returns you to the previous screen with the selected Rate Plan record displayed in Active status.
Deleting a Rate Plan
You can delete both active and suspended Rate Plans. Once deleted, a Rate Plan cannot be reactivated. However, Dex retains all deleted Rate Plans records in case a Merchant or Partner raises a billing issue that could be a legal liability for Forte.
To delete a Rate Plan, complete the following steps:
- Navigate to the Rate Plan Datagrid (Merchant Application > Rate Plans) and search for the desired Rate Plan by Name or Fee ID number. You can also filter the list of Rate Plans by Status = Active, Suspended, Services, Sales Rep, or Portfolio ID or Name.
- Access the Delete Rate Plan Modal using one of two methods:
- From the Rate Plan Datagrid, clickÂ
> Delete in the row on which it’s displayed.
- Access the Rate Plan’s Details Screen and click Actions > Delete.
- From the Rate Plan Datagrid, clickÂ
- Confirm the deletion by clicking the Delete button on the Delete Rate Plans Modal. Dex returns you to the Rate Plans Datagrid.
Auto Enrolled Applications
NOTE:Â This functionality will only be available for specific Partner IDs that have been set up for Auto Enrollment and will consist of the following actions to take place in dex.
Auto Enrollment in dex:
When the Merchant Application is submitted, and Verification Checks {TIN Check} have Passed, the Application will be set to ‘Approved’
- Backend processes will look for an existing Organizations ID to be selected.
- An Enrollment Template or a Rate Plan that has been created for the Partner will be used for enrolling the Merchant.
- An existing Merchant Org ID will be used, or a new Merchant Org ID will be created based on the applicants’ Fed ID.
- If applicants use the same Fed ID as an existing Merchant, existing Merchant Org ID will be used.
- If the applicant is a new Merchant, using a new Fed ID, a new Merchant Org ID will be created.
- If an existing Transmitter ID is identified using an Enrollment Template, it will be selected during the auto enrollment process. If a new Transmitter ID needs to be created and is unique for each merchant, one will be created during this process.
- If FTP credentials are required for the Merchant, the user ID and Password will be created.
- Auto Enrollment kicks off, via backend processes.
- If Training is Required, via the Enrollment Template, the Training Email will be sent out.
- Webhook Credentials will be created.
- MID/Location is created using the Enrollment Template or Rate Plan.
Note: Various fee codes may be customized within an ISO(s) rate plan to drive specific functionalities for the Merchant being enrolled, including billing events.
- Webhook is sent out, if enabled for the Partner in Enrollment Settings.
- PayFac Boarding is kicked off.
- Once the response comes back from the processor, the Merchant will be Boarded to the associated PayFac Profile ID, based upon the MCC code (Business Category and Type of Business) that is submitted on the Merchant Application.
- A PDF is created of the Merchant Application and will be available in the Location Details > Documents tab.
- Dex Comments will be inserted in the Application Detail > Comments tab visible to Forte Employees that says, ‘Auto Enrolled Application’.
- Enrolled Notification is sent to the Partner/Merchant, if enabled.
- Dex Invite is set, if applicable for the Partner/Merchant.
- If the rate plan includes fee codes for Straight Through Processing, the merchant is queued for boarding to Optum during the enrollment process and boarding to Optum is initiated once the merchant has been successfully boarded to the card processor.
- The Transaction Approved and Transaction Declined notifications with specific Optum wording are automatically enabled for the merchant location for merchants whose rate plans include fee codes for straight through processing.
 ) button to update the Plan Information if needed. Clicking Save Changes returns you to the Rate Plan Details with your changes displayed.
> Invite in the row on which it’s displayed.